Monday, 31 January 2022

FRIDGES - 3-WAY (GAS) VS 12V COMPRESSOR

There seems to be a rumour going around that for some reason gas (3-way) fridges are both unreliable and/or "yesterday's technology". Nothing could be further from the truth. Gas refrigeration is by far the cheapest and most convenient way for normal van use, and the 3-way fridge is the ultimate in versatility.


It probably stems from the fact that "fridge not working on gas" is a common question - but what people seem to ignore is that this problem usually occurs after 20 years of solid service! Compare that with the life span of the average kitchen fridge.

Whenever somebody asks for advice about a gas fridge, you can always bet that someone else will advise to get rid of it and fit a 12v compressor fridge.

12v Compressor fridges exist because there are situations where gas isn't available - ie in many yachts. They are also getting more use in motorhomes because solar power has greatly increased in efficiency and price has come down. But they are still 12v only - no power, no fridge, so the 12v situation has to be constantly monitored, and even if the roof is covered with solar - there is still no escaping the weather, especially in the UK winter. However in the interest of balance I do agree that there are certain cases where a compressor fridge might make sense. An example of this would be where the owner has higher than average 12v system knowledge or perhaps the van is intended for use much further south - ie winters round the Med.

But spending between £1000 and £2000 for the fridge and possible 12v upgrades plus labour? Compared with fixing the original fridge that will cost between zero and a couple of hundred quid?

My contention is that if you possess a working 3-way fridge, there is absolutely no logical reason to rip it out in favour of a compressor fridge. Gas is cheap and plentiful - and always present - otherwise you would have no cooking or heating.

The 3-way system has been around for donkey's years and is as good today as it ever was. 220v when on EHU - 12v while driving and gas at all other times - always on, beer always cold.

Tuesday, 13 April 2021

Classic Hymers and the MOT test.

One of the common posts on the Classic Hymers Technical Facebook group is about MOT woes. Usually it's a photo of a long list of MOT defects that have resulted in failure. 

So here is my advice on how to minimise potential MOT pain.

I will start by being blunt (again!) - if your van fails it's MOT for any of the following reasons, then you are silly and have only yourself to blame. These are any lights not working, wipers or washers not working and horn not working. Seatbelts working and not chewed by the dog. These are the easy things to check, so at the very least all these things should be checked before your MOT. I know it sounds simple, but you will be amazed at who doesn't.

Next after this is tyres - there is really no excuse to fail an MOT on tyres when any branch of any of national tyre place companies will check your tyres for free.

So that's the easy stuff out of the way - but what about the hidden stuff that the average owner can't check?

My suggestion is as follows. Take your van to a garage you trust - hopefully you have one for your service work, and ask them to do a pre MOT inspection. If they refuse, then take it to a garage that will. But it is important that the garage is not also the MOT garage - they must be independent of each other. That doesn't mean to say that they don't know each other, just that they are independent. The main customers of MOT garages are other garages - they are in the trade together, so there is mutual respect.

It is well worth paying for this service because the inspecting garage will inspect everything that the MOT garage will inspect, but most importantly they will rectify as well. This means that the actual MOT should go without a hitch and just be a formality.

There is another huge benefit to this method, and that is that over the years you will get an excellent MOT record - all MOT history is now available online, and there is nothing worse to a prospective purchaser than a long list of MOT failures and advisories, especially for simple items like lights and CV boots - all it does is scream out - careless owner, couldn't be bothered.

You would be having to pay for the rectification of these faults anyway - so why let the MOT tester find them and enter them into the MOT computer system for all to see, forever. Far better to fix the faults before the MOT, and then, the test should just be a formality. This also removes the suspicion that a failure is being made to generate work for the garage. They are far less likely to try this when they know the van has been pre-mot'd by another garage.

However there are 2 parts of the test that might not be covered by this method, because the inspecting garage will most likely not possess two important pieces of equipment that the MOT garage has - these are the brake tester and the exhaust gas analyser.

But you should not worry too much about these - your brakes have to be really poor to fail the MOT, and a quick test drive to test your brakes should be all that is necessary. Do an emergency stop up some quiet road - you will know if there is anything wrong, and the van should stop in a straight line and not pull to either side. The handbrake will have been checked by the inspection garage - you don't need a machine to test a handbrake.

The exhaust test can be particularly stressful on an old diesel classic. There are two or three things you can do to give yourself the best chance. First - get the inspection mechanic to look at it himself and give his opinion. He is in the trade, and he knows his stuff. Second - make sure the engine is properly warmed up before the test. If possible, take it yourself and keep it ticking over for as long as possible before the test. Warm engines put out much less smoke. Thirdly, if you are really worried about the exhaust test, there are several diesel additives you can run through beforehand - again, your mechanic should be able to advise you. But generally speaking - if it passed last year, it should pass this year.

What I do is I combine my annual service at my trusted garage, with the MOT. The van goes up on the ramp, is fully inspected, brakes checked and adjusted, oil and fluids checked plus everything else on the MOT list. And then I pick it up and drive it to the same MOT centre I have used for the last few years, and it flies through, year after year. And anybody can go online with my reg, and all they will see is PASS PASS PASS.

That alone is well worth the extra money. Classics are not like modern cars - they are 20 to 40 years old, and the maintenance and inspection requirements are quite different to modern cars.

Of course I am not saying this is the only method for all owners - many owners do their own mechanical work - so this doesn't apply to you. But if you always use a garage for your maintenance work, and don't know much about maintenance and inspection, then using one garage for inspection, and another for the MOT itself, makes very good sense all round.

This is how the commercial truck world works - they never send a truck straight from the road to its MOT. It goes for service and inspection, and only then does it go for the MOT, where passing is usually just a formality, and it's straight back on the road again - time is money!

Monday, 8 March 2021

Solar Panels for Classic Hymers - new install, replacement or upgrade. (Updated 2024)

There have been a few questions on the Classic Hymers Technical FB group recently about solar panels, and it occurred to me that I haven't done a blog on the subject with specific reference to classic Hymers. This is not intended as a definitive right/wrong instruction manual for solar, just a general guide based on what I have picked up over the years from my own and other solar installs.

Most vans nowadays have some sort of solar installation. Many classics had them from new, or near new, and they were really expensive back in the 90s, but pretty much now most of those will be at least 25% or more down on performance. Technology has moved on - panels nowadays are around twice as efficient and at least 5 times or more cheaper than 90s technology. At the same time, the average need for power has gone up, with most owners nowadays wanting an evening's viewing of TV, a few hours of laptop, plus charging of all their devices - and all in addition to the normal requirement of lighting the van and running the pumps and fans.

The good news is that all this is possible, and more, with a basic single battery system, and a decent modern panel and controller. The aim of any solar system is to put back during the day, what you take out at night. If this is achieved, then a van can stay off-grid - ie no need to plug in or drive. This is of course dependent on the weather, but it is a perfectly reasonable expectation to have - at least in the summer months.

So let's look at what a typical modern system has to offer, in the context of a pre 95 classic Hymer motorhome. 

Let's first look at upgrades. My advice generally, if you have an existing system, especially one that you know to be over 20 years old, is to replace everything. The reasons are pretty much as already stated - technology has moved on and prices have fallen. The controller in an old system will be PWM (see below), the panel(s) will be very old and the wiring will also be suspect, and at the very least need checking. Of course, if you do have an old system, and it appears to be working OK, then don't fix it if it isn't broke - the true test of your electrical system is simple - does it ever disappoint you? If so, then it's time to do something about it.

Another good reason to upgrade to modern panels is that they perform so much better in low light. So if you use the van a lot in late winter, early spring and autumn, then you will benefit, as modern panels bring in more power when the sun is lower and weaker.

So let's assume that you have decided to either replace everything, or that you have nothing to begin with. So let's talk about the two main components of a solar system - the panels and the controller. The wiring and layout is quite simple - a solar panel sits on your roof - it has two wiring terminals on it - pos and neg. Two wires go from the panel to a controller, which is basically a box about the size of a normal battery charger, where they connect to two terminals that are clearly  marked pos (+) and neg (-) "panels" or a symbol that looks like a panel. The controller is mounted at a convenient place, usually on a wall close to the battery. Then two more wires lead from two similar terminals on the controller marked "battery", and go to the battery. That, for the very non technically minded, is the basic layout. It is very similar to how a battery charger plugs into the mains, and has two wires going to the battery - only in this case, the panel supplies the power, rather than the mains. All a solar controller is, is a sun powered battery charger.

There are other features - such as switches fuses and cable routing and waterproofing - but all these will be covered later.


Panels

So let's talk about panels. Panels come in many shapes and sizes, two different main technology types, and two formats.

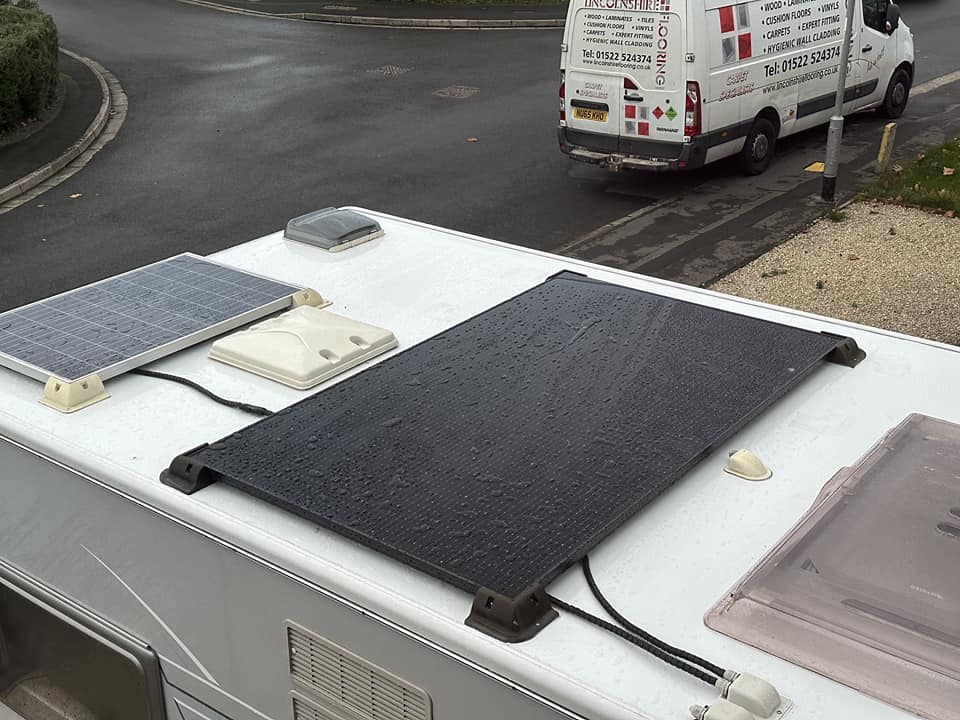
The two formats are flexi and rigid. Rigid panels are the traditional type that you see on houses and offices. Flexi types are specifically for leisure vehicles - vans and yachts. Rigid panels are exactly that - rigid, so are difficult to fit on a curved surface. Flexi panels solve this problem nicely. There is quite an online debate about which is best. I have my own opinion, which is that rigid panels should be used where possible - ie if the roof is flat, or near flat. The reason is that rigid panels are cheaper, and they are easier to get off and replace if they go faulty. Flexi panels are more expensive, and if you are unlucky enough to have to replace one, they are really hard to remove. There is also another reason I like to give, and that is that rigid panels are produced by the millions, because they are used in big solar farms. Flexi panels are produced in the thousands, specifically for the leisure industry. Solar farms demand 25 year warranties, so are generally produced to high commercial standards. Generally speaking with regard to flat roofed classic Hymers - rigid are usually used.

While reading up on the latest in flexi panels, I came across this useful info about them - 

"
One decisive factor in determining the lifespan of Flexible Solar Panels would be the coating material. The two more popular types would be PET and ETFE. PET is a polyester-based plastic and ETFE is a fluorine-based polymer.  And, the main differentiating factors between the two would be strength, durability, and resistance to corrosion. While PET-laminated Flexible Solar Panels generally have lifespans of up to 5 years, ETFE – laminated Flexible Solar Panels have lifespans of up to 10 years." 

I have also seen ETFE advertised as PTFE, they are the same, or very similar.

Rigid Panels - The two different technologies are mono-crystalline and poly-crystalline. This refers to the type of silicone used in the actual cells. generally speaking mono is better and slightly more expensive, but these days it is less of an argument, especially when you are buying secondhand panels from suppliers like Bimble - see below.

Sizes are nowadays pretty standard - it is not an oversimplification to say that in general, with regard to van installations, there are only 2 basic sizes - big and small! Big panels are those used on solar farms. They are generally about 1750 x 900. Smaller panels are generally around 900 x 500. There were very few large panels around 30 years ago, so original solar installs on Hymers were usually always small panels. In terms of power - the larger panels are in the 300 to 400w range, and the smaller ones are around 100w. More on power below.

Fixing and brackets

Fixing panels to the roof. This is quite a hot topic that always attracts a lot of online discussion. The big debate is basically over screws vs adhesive. Nobody likes to drill holes in the roof of a cherished motorhome, so there is a strong case to be made for sticking them on and many advise this online. Flexible sealer adhesives have come a long way in the last few decades - silicone is a thing of the past - yesteryear's technology - but modern adhesives can literally stick the roof of your van to a crane, and support the weight. But only if chosen and used and prepared correctly.  And that is the problem for the DIY installer - no motorhome discussion group or forum is complete without at least one story of panels flying off on the M6, and just one story like this frightens people away from adhesive. Most horror stories are simply down to bad method or workmanship. Even professional installers can have bad days.

I believe that the best course for the amateur installer is screw and glue. There is no real disadvantage to having screws in the roof of a 30 year old van, and a modern panel installation at this age is likely to last the rest of the life of the van. There are also a couple of reasons for screw and glue that might not be apparent until you are up there for the first time. The first is that a screw will compress the adhesive nicely, forming a solid combined bond. The second is that a big panel can be  difficult to position with adhesive only - it can slide, and as it does it smears the adhesive. It's fine if you have access ladders and platforms and 2 assistants to help you lower a panel gently, but can be very difficult on your own while crawling on your knees on the roof. But if using screws and Z brackets, you can screw one corner down finger tight, without adhesive, and this will lock the panel in position. You can then go to the next corner and there is enough flex to lift up the corner and bracket, apply adhesive, and then let the panel drop is place in perfect position, then screw, and then onto the next corner, finally arriving back at the first corner where you can remove the screws, lift the corner, apply adhesive, and then drop and screw. This is a tried and tested method for fixing a large panel single handed. If using the long streamlined front brackets, then you do front then back, rather than corner to corner. But please note this method is suggested for big modern panels, which are hard to handle. if you are fitting small panels that you can simply pick up and place, then they are a lot easier.

The absolute number one rule about using adhesive is that the mating surfaces must be squeaky clean and totally free from dirt and grease. This means the section of roof where the bracket is to go, and the bracket itself. This doesn't have to be a complicated process, but you must take into account that the roof on a 30 year old van can have quite a tough layer of dirt and grime, baked on. A good scrub with laundry powder is a good method, followed by a thorough wipe off and then a final deep clean with solvent. All you need is a pack of cheap microfibre cloths and a bottle of solvent from the discount store. Solvent should be at least acetone quality - my friends in the trade use good old fashioned brake cleaning fluid. It works, and is cheap. Avoid solvents that have other chemicals added to them, or are less refined and oily - so turps and white spirit are to be avoided if possible. If you are a beginner, then a good course of action is to do a test. Stick two similar pieces together as a test, leave it overnight, and then try and separate. If you get it right, you will be amazed at just how strong it can be. 

As for screws, as well as the problem of water ingress and corrosion, usually 10 years down the line, there is also the problem that motorhome roofs are not exactly the best thing to screw into. There is a thin aluminium skin in the case of B class Hymers, and a reasonable thickness of fibreglass on S class Hymers. Under the skin there is stiff foam insulation. The whole thing is about 32mm thick, so you would never use a screw longer than 25mm. The trick with screws in the roof is not to overtighten. You want the threads of the screw to be fully interlocked with both the aluminium skin and the foam interior. The last thing you want is to apply too much force so that the threads strip and the screw continues to rotate - which it will very easily if you go at it hard with an electric impact driver. You are not screwing into wood or hard metal, where you want the screw torqued up to the max, you just want it to the point where you feel resistance, and the adhesive is just oozing nicely out of the edge.

Personally I use both at the same time - screws and adhesive. Not because I have less faith in one or the other, but simply because (for me) it makes for an easier installation. Screws have to be properly sealed, so I use the adhesive to both stick and seal. The screws I prefer are hex head stainless steel self drilling screws. These drill their own hole, so it is tight, and it is a single operation with a power drill. At the same time it forces the mating surfaces of the bracket to the roof, and seals everything. See photo.


Just the right amount of adhesive under the bracket, and when you tighten the screws it pushes out just right all round - sealed and stuck.

You can make your own brackets from aluminium angle, or you can buy commercial ones like in the photo.   You can also get really snazzy curved aluminium extrusion which also acts as an air deflector.

There are also plastic brackets available and these can be screwed or stuck on. Personally I don't like the big plastic brackets, and this opinion is shared by several professionals I have spoken to. All the instances I have seen of panels coming off have been using these plastic brackets. That is not to say problems don't occur with other methods, just that the plastic brackets seem to be more vulnerable to bad prep and installation. One reason put forward is that some plastic brackets have smooth shiny surfaces, and also possibly have residue of the releasing chemical used in the injection moulding manufacturing process. This, combined with bad surface prep seems to be responsible  for the majority of horror stories that are seen online. Another reason is that these plastic brackets are hollow - they only have a thin bevel round the edge in contact with the roof, plus many of them don't have screw holes.

But let me be clear about the whole bracket/screw/glue debate - there are plenty of vans out there with adhesive only plastic bracket panels on the roof. But the same goes for Z brackets, and I have yet to see a story about a screwed and glued Z bracket panel coming off. But the crux of the debate is surface prep ... the majority of horror stories have come down to bad prep, so the default advice has to be screw and glue, because the screws will act as your safeguard against bad prep.

As for screws only - there is no argument for screws only! You need to seal the screws against water ingress anyway, and sealer adhesive is the best way to do this. The only case for screws only is when the panel is attached to metal roof bars.


Also called spoiler mounts, and also available in ABS plastic

Plastic brackets - not my favourite, but can be used with care.

This is a nice example of plastic brackets glued and screwed (photo Mark Earles)


I generally prefer these aluminium Z brackets. They are versatile, low profile and easy to work with. I usually rough up the bonding surface with a bit of sandpaper.


Self drilling screw - you don't have to use hex head - any other head you prefer is fine. I just prefer hex head because there is almost no chance of the drill socket bit slipping off.  A variable torque drill on a low setting takes almost all the guesswork out. You don't want to over-drill, or over tighten screws into a thin roof. I usually use No 8 x 25mm (4.2mm x 25mm) stainless screws. However this is just my preference. Another option is to use stainless self tappers (ie not self drilling), with or without pilot hole. if you are confident with the cordless driver you can force a self tapper through the aluminium skin. or you can drill a 2mm pilot hole - just through the skin.

Which adhesive? I have only ever used one - Soudal Fixall Flexi. It is a flexible bonding sealer. It was recommended to me many years ago by Peter Curry who is one of the most knowledgeable classic Hymer engineers in the trade. I have never doubted the decision, and I always have a tube on the go in my van. It is general purpose. I seal windows with it, fix panels, make repairs - like most owners I hate drilling holes unless absolutely necessary - if I can stick it - I will. There are other makes - plenty of them. Sikaflex is the most famous name - but because of what I have just stated - I just don't know the various Sikaflex numbers. It's simply the fact that I have never used it. "Hybrid polymer Flexible sealer adhesive" are the key words to search for. CT1, as sold by Bimble is another example.  

On the subject of Sikaflex, I have noticed that there is a whole bunch of internet snobbery about Sika. Every time somebody asks any question about sealer adhesive, several answers will come up like "only use Sika 123", or 789. Or XYZ. With no further explanation. This is no more than some blokes just liking to sound expert. It has its roots in the yachting forums, where sealers are much more important, and Sika has traditionally ruled the roost. But Sika is no different to the rest. Except for the price. And all the numbers are confusing for the beginner, so why bother when you have at least 2 cheaper and easier alternatives readily available - Soudal or CT1.

Finally, on the subject of brackets, let's talk briefly about removal. No owner fits a panel knowing it will have to be removed one day, but shit happens - hail damage, collision with trees, drunken rooftop dancing, vandalism, or even just a big upgrade, can all result in the need to remove a panel. Removing panels can be a real pain, especially those fitted by the germans 30 years ago using screws and mastic! But it is always possible. The trick is to use a thin scraper blade, and help from a heat gun or hair dryer if possible. Work the blade under the edge and keep working the gap wider and wider. It needs patience and elbow grease, but it will come off - one bracket at a time. This is another reason why I favour Z brackets screwed and glued - they are the easiest of all to get off because there is less surface area and you can get at them, certainly compared with the plastic brackets. It is only when you actually try and remove a bracket fixed with a modern polymer adhesive that you realise just how bloody strong they are! You have to use the same sort of method as a stonemason splitting a block of marble - you create a small gap, and keep driving tiny wedges in and slowly and carefully separate the two. If you are careful with the scraper you will be just left with 2 screw holes and an undamaged roof. Screw holes can be filled with the same adhesive and smoothed off. Holes filled in this way will never leak. I have holes in my roof from 10 years ago filled with Soudal and I have to get right down and look hard to even find them - the filler has weathered over. I am on my 3rd major panel installation in 12 years, and I consider my roof to be no worse for wear because of panel screws.


Controllers

Now let's talk about the other main component - the controller. 

Controllers also come in several shapes and sizes and also in two technologies - PWM and MPPT. It is important that the controller is matched to the panels, in terms of power rating. PWM is now generally regarded as "yesterday's technology", replaced by MPPT.

For those who are technically minded, older controllers were PWM (pulsed width modulation). MPPT stands for maximum power point tracking. Basically a solar panel's voltage goes up and down in direct proportion to the sunlight. The controller takes this varying voltage, and converts it to a constant voltage to charge the battery. A PWM controller just uses simple power transistors to convert the voltage, and it uses a very simple formula to do so. As a result of this simple formula, bits of power get lost. It's a bit like 10 divided by 3 is 3 remainder 1, and the 1 gets discarded. That is a gross oversimplification of course! The bits that get lost are dissipated as heat.

An MPPT controller on the other hand has its power transistors controlled by a computer chip. This enables it to make the most efficient conversion at any point in time, so the "remainders" are collected - ie maximum efficiency - about 10 to 20% more efficient, which adds up nicely over time. the same computer chip that controls the conversion, also controls the battery charging  - much in the same way that a modern digital 230v battery charger is more efficient than the original "dumb" charger that was installed in the 80s and 90s. 

MPPT chargers used to be so expensive as not to be affordable by motorhome owners, but thanks to those lovely hard working Asians that have brought us all sorts of digital goodies in the last few decades, so it has been for solar controllers and you can now buy a decent quality 20amp MPPT solar controller for less than fifty quid - so it's a no brainer.

See below for more on controllers.

Cabling

So having described panels and controllers, let's talk about another aspect of the system  - the cabling. As already stated, cables run from the panel(s) to the controller, and from the controller to the battery. It is important that these cables are thick enough to carry the power from the panels, to the controller and to the battery, efficiently - in other words, they have to be thick enough. Nowadays there is a standard solar panel cable that is used across the industry. It has its own type of connector - the MC4. The standard as far as motorhome use is concerned is 6mm. This is a semi rigid black cable sold simply as "6mm solar panel cable" - and is capable of carrying 70amps. You should use this if at all possible - for the simple reason that most panels nowadays come with short "tails" of cable with MC4 connectors on them, and 6mm solar cable usually also comes in fixed lengths with pairs of MC4 connectors on the end. So all you have to do is run the cable and plug straight into the panel. The MC4 connector is designed for commercial solar farm use and is weatherproof and easy to use. MC4 connectors are either male or female which enables pos and neg wires to be safely separated. Unless you have a very good reason, it is best to use dedicated solar cable and MC4 connectors, between the panel and the controller.You don't have to of course, you may have a good reason not to, but in the absence of a good reason - use the industry standard. The only slight drawback with solar cable is that it is a bit more rigid than normal cable - which means that it doesn't like to go round corners easily - you should bear this in mind when planning your cable routing. But generally speaking most van solar installations can use it easily.

Typical solar cable with MC4 connectors. Tip - if your panel already has MC4 tails - male and female, then order a ready made solar cable twice as long as you need for the run to the controller, and cut it in half. You will be left with 2 pieces, male and female, which will mate nicely with the panel tails, and two bare ends for the controller.


From the solar panel to the controller, at some point the cable must come in through the roof, and of course this must be made weather and water proof. The point at which this occurs is generally called a "cable gland" - see pictures. This is generally a protective plastic (or metal) cover, which is sealed against the ingress of water, and covers the hole you have to drill in the roof for the cables. Where to drill this hole and how big is individual to each van - but it usually comes down to common sense. If in doubt ask online for specific advice. But I will pass on a couple of tips I have picked up from the trade. Pick a convenient cupboard or wardrobe, and drill up from the inside out with a small drill first. You will have measured and estimated - nothing is more stressful than drilling your van roof! Then enlarge the hole from either side, minimising dust and swarf - a vacuum cleaner nozzle is useful to catch this as you drill. Don't be shy on hole size - 12 to 15mm - is best for a twin cable solar run - you should be able to get an MC4 connector through the hole.


This is the commonest form of cable gland. Don't make the rookie mistake of forgetting to thread the cable through the eyes, prior to connection! No screws, just sticks to the roof.

From the controller to the battery, you can also use solar cable if you like, but sometimes you will find that solar cable is not as flexible as you would like, so if you run up against this, you can use normal cable. Just make sure that the cable you use is thick enough - if in doubt, ask online. Generally speaking, an average 200w to 400w van solar system will need 10 to 20 mm2 cable. Unless there is a long distance (ie over a metre) between the controller and battery, then for a 400w panel I use 10mm2 flex cable between controller and battery.

If you are wanting to use old cabling for a new installation - ie because it looks ok and is already routed and fixed, then fine. An easy way to check if it is up to the job is to use a multimeter. All you have to do is to measure a fixed voltage at one end of the cable, and again at the other. Measurement must be to within 0.1v - point one of a volt. Then measure the diameter of the copper in the cable. Then either google for the standard loss chart, or just ask online. You don't want any more than half a volt difference - ie 12.5v at the top should be no less than 12.25v at the bottom. Preferably a lot less - less than 2% is always preferable.

Cable routing is a bit of a black art, but generally a common sense route should be obvious. If you can't get a hidden route down from the roof to the floor, then consider using that plastic cable trunking you can buy in BnQ - it comes in white and brown, and it soon blends in.

Classic Hymer Specifics

So that's the basics. Now let's talk about Classic Hymer specifics. 

The first discussion is - what size panel? Well the modern answer is - as big as you can fit on your roof. This really is true. The problem is that many owners simply don't understand solar power. They think a 300w panel is a constant 300w - like a charger or a battery - it's not. A 300w panel will only deliver 300w in absolutely perfect conditions - that is a perfectly clear sky and with the sun absolutely directly overhead. This actually never occurs in the UK, because we are north of the tropic line. So the sun is never directly overhead - the highest it gets is on the summer solstice, the longest day, June 21st. The most I have ever seen from a 300w panel in the UK is about 260w, and this only for an hour either side of midday.

At the opposite end of the scale is winter - December 21st, the winter solstice, the shortest day. Even if the weather is clear on this day, you are unlikely to see more than about 100w from a 300w panel, and again, only an hour either side of midday. You literally only get a fraction - 25% if you are lucky, from a solar system, in mid winter, than you do in midsummer.

Another problem is that panels on a vehicle are mounted flat, which reduces the efficiency. Solar farms have their panels tilted south at 45%, which makes a huge difference. It is possible to tilt a van mounted panel, but it is mechanically complex and not relevant to this article.

So you really do literally have to fit the biggest panel you can! With a modern solar system you generally have more power than you need in summer, and never enough in winter. But given that most owners use their vans in summer - then that's OK. But other owners - full timers for example, who want to be off grid as much as possible in all seasons, then these systems really do have to be as big as possible.

The good news for classic Hymer owners however is this. Big panels of 300w and more, are now available at good money from suppliers like Bimble, and there is a perfect place to mount them - on the front roof of the van, over the cab and the drop down bed. Unless you have a rooflight here, it is a perfect place for a big panel. See photo. It is out of the way, and doesn't affect the rest of your roof - if you have a top box or satellite dish etc. It is also a convenient place to route cable - down the wall just behind the passenger or driver seat.

It is the perfect place for a big panel - whether you think you need a big panel or not, with a big panel costing as low as £90 from Bimble, you can have a 300w MPPT solar system on your classic and have change from £200 if you DIY.

This photo of a 93 S700 Hymer shows a big panel mounted at the front - around 300w, and two smaller panels either side of the main rooflight - 120w each, giving nearly 600w in total - and still the rest of the roof is free for all the other usual stuff - boxes, aerials etc.


For power users - ie those who full time, or just need more power, then the front roof is the place to start - by buying the latest panel you can get 400w on there, and by shopping around you can get 2 small 100w panels that fit either side of the big roof light - see photo. 

If your van already had old panels, mounted usually in pairs, in the middle or rear of the roof, then you have several choices, depending on what you want. You can re-purpose that part of the roof - for a top box perhaps. Or you can find modern higher power panels to occupy the same space. However you will also (possibly) find that the original panel mounts are stainless steel and very solidly mounted - and removing them can be a real pain. You can try and find new panels that are an exact size match, but generally I haven't had much luck on this score. Sometimes it's just best to leave them. I have seen serious damage done to roofs trying to remove old panel brackets - so be careful.

That's why I'm such a fan of the front roof large panel setup - it's easy.

Now let's talk about specific controllers, and monitoring and display. Your pre 95 classic Hymer will have the usual twin meters mounted in a panel. One meter gives voltage, and the other (the famous STROM meter!) displays power in amps. The power meter should go into green when the battery is receiving power, and red when you are using power. So far so good. But the problem is that solar systems were never fitted as standard at the factory by Hymer - they were always fitted by dealers or owners. And due to an idiosyncrasy of the electrical design of the Hymer 12v battery system, the circuit that drives the Strom power meter is buried deep behind the fuse panel. The result is that if you connect your solar controller (or anything else for that matter) directly to the battery terminals - any power that flows in and out through that connection, will NOT be displayed on the Strom meter. It is possible to have a solar system that displays on the Strom meter, but to do so you have to connect the cable to a specific terminal which is located behind the fuse box under the dash. It is quite an awkward job, and most owners, even dealers, just never bothered. The main reason for this is that most controllers have their own display (and nowadays maybe an app) so although the solar power going into the battery would not show on the Strom meter, it would show on the display of the controller, so you could at least know that your solar is working and doing its job. 

But the downside of this, is that you have to mount the solar controller where you can actually see it. This isn't always convenient, and for this reason, you can get solar controllers with remote displays. But even with a display of solar power on the controller, you then have to look at the Strom meter to see how much power you are using at night, or getting while hooked up.

Sorry if it sounds a bit confusing! But that's the way it has been over the years in most solar installations. But now there is another way, again thanks to modern technology. It is called a battery monitor. A battery monitor comprises of a digital display, and a sensor that mounts directly on the battery. It is quite easy to install. If you have one of these, it displays everything that the two panel meters would, plus it incorporates the solar as well. This has the added extra benefit for some owners that you can mount the controller out of sight - you don't need to see it. Plus many modern controllers come with the option of a display - and the ones without a display are always cheaper!

Once you have a battery monitor - it displays everything you use, and everything you receive - at a glance. And it does it on a nice digital display, often in colour, and much more accurately than the old fashioned panel meters. Now I do understand that the old meters have a certain retro chic, and there is absolutely no reason to do away with them - they will still work as before. And maybe you don't want or need to see the exact state of your electrical system - you just want the lights to stay on and the pumps to run. Every owner is different. But just as panels and controllers have come right down in price, so have digital battery monitors. So if you want to see the status of your power system at a glance, you can - inexpensively. These days you can even have it all displayed on an app on your phone or tablet - if you want - it's up to you. There is a separate article on this blog about battery management and monitor systems.


Why have this
When you can have this - actually you can have both!


Suppliers and parts


Suppliers and where to buy (I don't do commissions or affiliate links!)

Panels. In the UK, my one stop shop is Bimble Solar. Bimble is a strange outfit - they started many years ago in installing the very first solar powered stage at Glastonbury, and the business appears to have grown out of that. They stock a wide range of new stuff - mainly for the off grid property market - ie houses with solar. Their speciality appears to be buying secondhand panels in bulk from large companies. These usually have plenty of warranty left on them, and really do represent excellent value for money. They are particularly good for the large panels that fit perfectly on the front of a Hymer. They also stock Epever Tracer and Victron.

If you have decided you want  a flexi panel, you should also consider Bimble - they stock a flexi panel that a friend of mine in the motorhome trade now only uses, simply because the failure rate is far lower than any other he has used.

Other well respected UK suppliers (and there are many more) are 12v planet, Sunshine Solar and Photonic Universe - if you google UK solar panel suppliers, you will get plenty of hits, but bear in mind that leisure vehicle solar is a niche within a much bigger industry - house and office solar. So make sure whoever you buy from at least knows something about vehicle solar. The components are basically the same.

Edit 2024 - large solar panels are now appearing in normal electrical wholesalers - in the UK example City Electrical, who have branches everywhere. This is because building roof panels are now pretty much mainstream and roof and solar farm big panels are being churned out in huge numbers. We now have the weird situation where a 400w panel costs under £100 from City Electrical, but if you want a smaller one to fit a space on a leisure vehicle, you may have to pay double the money for half the size. 

Controllers. I am a great fan of Epever - a Chinese company that makes the Tracer range of controllers. They are well made and perform well. Top of the pile is Victron - a Dutch company who have their stuff made in the Far East to a very high standard. They are not cheap, but neither are they stupidly expensive. They have the very latest in technology and innovation. If you want to see on your phone what your battery voltage is and how much solar you are getting then both Victron and Epever have a solution. Bluetooth monitoring via app is now all the rage.

Ebay and Amazon are also good sources, as you would expect, but you do have to be careful. There is a mass of either counterfeit or copied or just plain rubbish Chinese stuff out there. You really need to know what you are doing. The worst case is that nearly every controller that is sold as MPPT on sites like Alibaba, Wish, Ebay and Amazon, unless it is from a reputable UK supplier - isn't MPPT at all. It's not even decent PWM - they just shove a big transistor in a fancy box, and write MPPT on it. They get away with it, because it does work after a fashion - ie your battery will get some charge - but only a professional armed with test equipment can tell you whether it is true MPPT or not - so they get away with it. Just search Youtube for "fake mppt" and you will see videos of guys opening them up and exposing them. With a genuine Tracer available for less than £50 - there is no point in taking the risk. My standard advice is just buy Victron or Epever - they are not expensive.

Other names and brands that I have read about or seen recommended are - Renogy - a one stop shop for almost everything solar. Redarc - an Australian company. The ozzies make some really cool solar kit - off grid solar is a big thing over there. 

SRNE are another Chinese company who make proper kit, similar to Epever. 

Morningstar and Outback are two more top notch manufacturers - mainly for house off-grid systems - very high quality.

$10 from Ali Express ... please don't!


Conclusion and more notes.


This is a blog, not a definitive instruction manual. It is intended as a guide, based on the many solar installations I have done, and with specific reference to pre 95 classic Hymers. Not everybody will agree with every specific thing I have said.

There are also some areas I have not covered in detail. Your battery system is very important - if you generate all that free solar power, you need to store it properly. A good battery system will give you back all that stored power at night, and when the sun is not shining. 

I also see the question asked about the air gap under panels, usually with reference to cleaning. Generally speaking I don't bother cleaning under panels. One day, when a panel has to come off, there will for sure be a horrible layer of crud, but it will come off with 10 minutes of elbow grease, so I can't see the harm in it.

Another question I see is about shading - ie shadows on your panels (from trees or roof furniture) are not good for the system. While this is true in a fixed installation, it's generally not an issue in van installations, except perhaps in storage for long periods. What I can say on the subject is that I have never seen any report of anybody having to replace a panel because of shading.

Fusing, switches and breakers are also another hot topic. I generally find that most people fall into two categories when it comes to fusing and switching - maximalists and minimalists. Maximalists want to install fuses and switches in almost every wire. Minimalists just install the minimum for basic safety and overall protection. I fall into the latter category, and in the case of solar installations my minimum is a good fuse at the battery end. If I need to isolate a panel, I just undo a feed wire, or plug. Modern controllers have all the basic safety features built in. But nobody ever got fired for being over cautious, so go with your gut. If you ask online, be prepared for 5 different answers!

Cleaning - it can get dirty up there. Generally speaking you get a feeling when you should check and clean your panels - eg after a long hot dusty drive. I have checked power and voltage both before and after cleaning a dirty panel, and I have been surprised how little the difference is. Wet wipes are my preferred cleaning method. I also welcome a good sharp downpour of fresh rain - I then know I don't have to check up there for a while.

"Load" terminals. Most controllers have 6 connections - 2 for the panel, 2 for the battery, and another 2 marked "load". This often confuses van owners. Basically the load terminals are not used in a motorhome installation. But they can be used in other installations. A very simple example would be a remote building not connected to the mains. For security lighting it might have a single battery, solar panel, and a light. The light in this case could be connected either directly to the battery, or if more convenient, the load terminals on the controller. That's all they are - an extra set of terminals that are in parallel with the battery. They can be used in a van if you like  - you can connect anything to them if it is more convenient to do so, rather than wiring directly to the battery, or to the van's other circuits. If you do so, then the circuit should be fused accordingly. A typical example in a van would be, for example, if a vans solar controller was installed under a bed, or in a garage, or other storage area, and the owner also wanted to install a light in that area, then they could power the light from the load terminals of the solar controller - if it was easiest to do so. I have used them to wire up extra 12v USB sockets occasionally. It all depends on where your controller is located in your van, but generally they are unused.

If you want to read more about digital battery management ...
https://hymers700.blogspot.com/2020/06/battery-management-for-classic-hymers.html

If you want more information on this subject message me, or contact me on "Classic Hymers Technical" Facebook group. https://www.facebook.com/groups/297054424534823/


Saturday, 24 October 2020

A different way to get UK Internet TV abroad

Those of you who like TV but travel abroad regularly will know what a pain it can be to tune in to BBC and ITV.

If you have a "normal" Freesat/Sky dish, it will work as far as central or southern France, depending on how big it is. beyond that - ie down into Spain and Portugal, you are looking at using a different satellite and receiver and a 90cm dish, which while not too complicated, is a bit of a pain for normal users.

More recently, owners are turning to the internet to get their BBC and ITV (and many others), but regular users will know that BBC and ITV can tell that you are abroad, and block you. 

You can get round this by using a VPN service, but again, this can get a bit too complicated for the average guy, and BBC and ITV are constantly playing cat and mouse with the VPN services and banning them - so it will work fine for weeks, then disappear.

And if you do use the internet for TV, then you have the added problem that usually you can only really do it easily on your phone laptop or tablet. If you want it on your main TV, you have to connect your device to your TV with an HDMI cable, which can be a pain, and it uses a lot of battery power, especially if you use a laptop.

The other problem is that internet TV uses quite a lot of data, and you have to decide whether to use your UK sim, roaming, or buy a local SIM card. However data prices have come down these last few years, and I find that this problem is nowhere near as bad as it was a few years ago. I find that you can generally buy data for well under €1 per gb, and if you have Netflix and Iplayer on the low quality setting, you can get about 3 hours of viewing out of a gig.

All in all it's always been a bit of a cat and mouse game, and certainly a pain in the arse sometimes. I do it for a hobby, but I know that many others just give up.

So that's the background - now I want to tell you about my latest solution, which I am extremely happy with. What follows assumes you have either a hotspot or wifi router in your van, with enough data for your viewing needs. My favourite 12v router is the Huawei B525 which has big antennas. I am not a fan of those tiny MiFi units - their antennas are too small. 

It revolves around the Amazon Firestick, which costs about £40, and plugs into the HDMI socket of any TV, and converts it to a Smart TV. Even if your TV is smart already, you still need a Firestick for this solution. Then you need to subscribe to a service called UK EXpat TV VPN. It's a few pounds per month. What is different about this service, vs all the other VPN services, is that they guarantee access to UK TV services - so that if UK TV services suddenly have a purge on VPN services and cause a problem, UK Expat make the changes at their end, so you have to do nothing at your end.

The other piece of the jigsaw is that they provide an app that you download to the Firestick, and this app only needs 3 clicks of the remote to start up.

So all you need to do, is switch on the TV, select the HDMI port, wait for the Firestick to start, click on the VPN, and you are then good to go - Iplayer, ITV Hub, Britbox, Netflix, Amazon and all the others, all work perfectly as they do back home.

All you need is enough data in whatever country you are in.

It is also a low power solution, which is important if you spend a lot of time on battery power.

I have been using it for several weeks now, and I am so impressed I decided to blog about it. I used to spend ages messing around with various VPNs and changing things around, but since I got this, it has been a doddle. 

I am not saying this is the only way to get UK internet TV abroad - there are loads of ways if you are techy enough - but I am saying that this is the easiest and simplest I have ever come across - it just works and is easy to use.

This should be of particular interest to anybody who winters abroad in Spain or Portugal (or Italy even) - data is cheap in these countries. France is a bit more awkward, but your satellite system should work in France if you have one.

I should also say that I am am not claiming any originality or credit for this setup - only that I have found it the easiest and most efficient of the many I have tried so far, and that that should make it more accessible to non techy people.

EDIT - If you are using a UK sim card - roaming - then you usually don't need the VPN - the firestick will think it's still in the UK. But if you use a local non UK sim, then the VPN is essential. 

This website is useful for getting data deals in different countries
https://prepaid-data-sim-card.fandom.com/wiki/Category:Europe

And this is UK Expat VPN - I daresay I could get a commission for linking them, but I can't be bothered - not many people read this blog anyway!
https://www.ukexpatvpn.com/

Friday, 23 October 2020

Classic Hymer Buyers Guide - the tough version!

UPDATE FOR 2026. You can add another 5 years, another 10 countries and another 100k to the words below, which were written in 2020. How time flies and I am now nearly 70. I have finally stopped and retired to France, where I have a small workshop. Feel free to contact for work, or just call and say hello.

I have just re-read the article and there is nothing I would change. Only that the vans are getting older, and on the Facebook group, breakdowns and ruined holidays are getting more common, every summer. So be realistic about taking on a classic. Good luck!
----

Hi and welcome - I am Ron Bentham, owner of several "classic" Hymer motorhomes since 1998, full time for the last 10 years and trekked well over 20 countries and over 200,000 Hymer miles. I have been running the Classic Hymers Technical group since 2017. I maintain a database of technical info and photos on all aspects of old Hymers and have some industry contacts for the stuff I don't know. I am known not to pussyfoot around!  - I tell it how I see it!

There is a steady stream of newcomers asking about how to buy a Classic Hymer ... So here is the smack in the face guide to how NOT to buy a classic motorhome! However it must also be said that many sales go without a hitch - honest sellers and willing buyers - but they tend not to shout about it online - you only hear the bad stories.

First thing to remember is that you are buying a box of tricks made from wood and metal that is 20 or even 30 years old. Stick an old fridge or TV, or even an old car in your back garden, and then go away and come back in 20 years - that is the sort of wear and tear you can expect. So the first thing to remember is that no old van is perfect. 

But when you do buy a classic van, there are certain things you should at least check, and are entitled to as a minimum.

There are 3 main areas you have to look at as a bare minimum - damp, appliances and mechanical.

Damp is the number one killer of vans and the most expensive to repair professionally. Fixing damp problems needs experience and can be labour intensive. This makes it expensive if you are using a professional, but also, means that it can be cheap if you do it yourself because your labour is free. But for most buyers, the number one reason to walk away from a van is damp.

It's not rocket science - the major areas for water ingress are easy to see and common sense can detect major problems. Windows are the main culprit - look closely around the windows for soft spots and discolouration.

Look outside at the sealing around the frame - you don't want to see new sealer on top of old - that's a bad sign. However windows are actually easy to remove and reseal - the first one might take you all day, but after that it gets faster - a window can be removed, cleaned and resealed in under an hour.

The worst case scenario for window leaks is that the damp has crept into the wall and the wall has become rotten. This then needs chopping out and replacing. 

Roof lights are the same as windows - check all around for the tell tale signs.

The next place to look is the floor, especially in the areas near the wheel arches that catch all the water spray from the wheels. Look outside, and in.

Then there are the joins where the walls meet the roof. In Mercedes S class classics, they have a single piece fibreglass roof that overlaps the walls, so problems here are potentially less. But in Fiat family B class, it is a traditional caravan style joint with an aluminium extrusion and sealer. It is hard to check this - but get inside the cupboards and poke around.

Finally - use your nose - smell and sniff - damp has a distinctive smell.

I haven't mentioned the use of damp meters - cheap ones are useless, and the good ones need knowledge to interpret the results. If you are really keen on a van - get a professional involved - unfortunately there are not many classic pros left around, most of them have retired, but they do exist.

Next - appliances. I have lost count of the number of people who simply never check that all the appliances are working properly. I see them online all the time - they come on asking for advice, and my first question is - has it ever worked (for you), and the answer is usually no, but the seller either said "we never use it", or it's an easy fix. It isn't! If it was, they would have fixed it.

Water, heat and refrigeration are absolutely fundamental to the basic enjoyment of a motorhome. So it is essential that you see and feel them working. Ask in advance of the viewing for the seller to switch on all the appliances. You need to feel the heat coming out of the hot air ducts. You need to see the fridge working. Ask the seller to switch on the fridge, on gas, at least 4 hours, preferably overnight, beforehand, and place a cup of water in the freezer, and another on the middle shelf. I shouldn't need to say what you should expect. But there is no way to test a fridge if it isn't switched on in advance.

A new Donetic 3-way campervan fridge is now around £1100 to buy and fitting is around £400. The commonest fridge problem is "not working on gas" - as long as the fridge is working on mains 230v (again, get proof) then the gas side can usually be fixed - it's a common problem. The parts are cheap if you DIY or a fridge expert will usually fix a gas problem for a couple hundred or so.

You need not walk away from a decent van because it has a faulty fridge - you just need to know what you might be in for.

However - non working appliances also has another, more sinister side - why? If heat and cold and water are so fundamental to having a good time - then why hasn't the previous owner had them fixed? It is a sad fact that some owners should never have really owned a van in the first place - perhaps they tried it, and didn't like it, or perhaps they were just lazy. Either way, if you detect signs like this, then you have to ask - what else hasn't been fixed or maintained. For some, this will be a sign of a bargain, but for others who want a working van with minimum problems - it should be a red flag. You really want an enthusiastic seller who knows everything about the van. The worst sellers are those selling "for a friend".

Heating - most classic Hymers have a Truma heater that both radiates, and blows hot air around the van. Again these can usually be fixed - but dealer labour can be £80 an hour - it soon mounts up. A new heater is around £500 plus fitting, but there are plenty s/h ones - they were not just used in Hymers. But do you want the hassle? To be fair, heater problems are less common than fridge problems. The commonest heater problem is flat batteries in the igniter - so take a couple of AA batteries!

Leisure Batteries - my attitude to batteries is really straightforward. Unless you have an invoice that shows that the battery is newish, then simply budget for a new battery. Batteries are consumables, and have a life of roughly 5 years. So other than testing that the lights work, the water pump pumps and the heater fan spins, don't worry about the battery - it's not a crime to sell a van with a worn out battery. Same goes for the charger - the charger that charges the battery when you are plugged in - the original, if still there, will be a dinosaur, and 99% of all vans have it replaced with a modern digital charger - around £150 for a good one.

Solar - same goes for solar - unless you have paperwork that proves otherwise, assume that any solar panels are old - many vans still have solar panels that were fitted in the 90s - and probably cost thousands back then. Nowadays solar is cheap and easy to fit, so is no reason to reject an otherwise good van. You can fit state of the art solar if you DIY and have change from £200.,

Mechanical - I am not a mechanic, I have always used garages for most of my servicing and repairs, but I have picked up a lot along the way.

Classic Hymers were made in 2 classes - B Class and S Class. the B Class were on Fiat/Peugeot/Citroen Chassis (also known as "Sevel" family type engines) and the S Class were on Mercedes - the old pre Sprinter 310D and 410D.

As you would expect this has given rise to endless often heated online social media arguments about what is best. I will distill and summarise some of these as subtly as I can. There are more Fiats than Mercs, so statistically there will be more reports from Fiat owners than Mercs. And of course bad news travels fast online - nobody ever just randomly posts that they have just had 5 years of trouble free motoring! But I have been analysing and counting reports for several years now, and can draw some conclusions. There does appear to be slightly more mechanical vulnerability in the B Class vans than the S Class 0 but you have to remember that all these vans are now over 30 years old - and just look at how many 30 year old cars are still on the road - not many! So the issue with Fiats vs Mercs is not which is better, but which age the most gracefully. And in this context the most important factor is how the van has been treated by its many owners during those 30+ years - so it follows that a well maintained Fiat will be better than a badly neglected Merc, and vice versa. Another thing I have noticed from all the reports is that Fiats tend to break suddenly if badly maintained, whereas Mercs tend to moan and groan and give you warning. And there is no favouritism in quoting what is pretty much common knowledge to the Boomer generation - Mercedes vehicles of the 70s 80s and early 90s were among the best on the road - but were also about 25% more expensive than anything else. Also - these are German vans, and the Germans were famed for their engineering back then, so there was no way any German motorhome manufacturer was not going to offer a Mercedes option.

So what you want to see in either van is evidence that it has been well looked after and serviced. Unfortunately very few vans have managed to retain a full 30 year service history - a few do, and when they come on the market they generally command top money. But if there is service history, look through it carefully - you don't have to minutely examine the technical details but you can get an impression of how the van has been maintained. The MOT history is also a good guide, and MOT histories are now online. The MOT history can tell you a lot about an old van - how many miles it has done each year. And of course the advisories and failures. For example - if I see a van that has either failed or got an advisory for silly things, like a bulb not working, that tells me that the owner didn't even have the sense to check the basics before he MOT'd it - and that is a red flag to me. So use the info that's available to you and examine it closely.

The only other major difference between B and S Class other than the engine and chassis, is that B Class vans have a different roof to the S Class vans. The S Class vans have a single piece moulded fibreglass dome room with rounded edges, which sits on top of the walls and overlaps. The B Class vans have roofs that comprise the same material as the walls with sealed seams where they meet - caravan style.

Unless you pay a professional for an inspection, which is generally a wste of time anyway, because the AA and RAC inspectors know SFA about motorhomes and the reports they produce are nebulous at best .... you can only address the basics. These are, in no particular order - 

The engine should start easily - a bit of smoke on start up is OK, as long as it is gone within 10 minutes of driving. The van should pull smoothly - if possible, find the steepest hill in the neighbourhood. 

The gears should change up and down, and the clutch should bite in a normal way. Even if you can't be behind the wheel yourself, tell the driver to do this.

The brakes should work! Seems obvious, but motorhomes hardly ever get to stop in an emergency - they are usually driven sedately. But you need to know that the van will stop hard - so find a quiet road and ask for this to be done. The van should not pull to either side under braking.

Check for oil - this can be a head scratcher - it is quite rare to find a 25 year old diesel that is squeaky clean. There is usually a bit of oil about. Look for lots of it, and shiny. If a van is leaking oil, then the slipstream should be blowing it all over the underside of the van. Also check - is it diesel or engine oil? Many vans have minor diesel leaks that are usually an easy fix.

Pretty much everything mechanical can be fixed - the worst case scenarios are bad engines and gearboxes. Merc gearboxes hardly ever fail, it's always the selectors, which are an easy fix. Fiat boxes have a known problem with 5th gear, so make sure you see 5th working properly - you need a motorway or dual carriageway.

If in doubt - get a garage involved.

Mileage - don't forget many classics have odometers in kms. You can tell a lot from a vans mileage, and also it's UK MOT history. A 25 year old van with 125,000 km on the clock should be classed as "low mileage"! Work it out - that's 5000kms a year. That means basic family use - a few weekends away and 2 decent holidays. But a van with 250k on the clock has done double that - it may have started doing basic family holidays, but later on in life it might have been full timed all over Europe. So ask as many questions as possible and look at the history. Avan that has been full timed and overlanded is not to be avoided at all costs, but also shouldn't be premium money.  

Everything else should be cosmetic - carpets, woodwork, worktops - just be realistic. A good bit of advice is to ask the seller to let you and your partner sit quietly in the van for a while. Feel it, smell it - is it whispering to you?

Finally - and this is the daft bit - the money side.

I have come to learn from many years of stories and meeting owners and solving problems - that when it comes to a classic vehicle - the price is secondary. If you have bought into the vibe and love the scene and want to join in, then plus or minus a couple of grand either way should not be part of the process. Finding the right van for you is the top priority. So you have to do your research. Unfortunately, they are not making them anymore, so you can't just go out and buy a van with the exact specification you want. So when the right van comes along, you have to have the money ready, and pounce!

Also - have a contingency fund. It is totally unrealistic to expect to pay fifteen grand for a 25 year old van and immediately drive it off to the Algarve and have no problems. It just doesn't work like that. Far better to have some money in hand, and expect to have to spend it. I always advise 10% - For less than £1000 you can get a new leisure battery, a new charger, and a habitation check from a reputable engineer, and maybe even a solar upgrade and iron out a few other niggles. Then a few weekends away to iron out the niggles, and then you are good to go. Be ready to buy a solid platform, and have the budget to make it your own. It is far better to buy a van with faults for the right money, and have the budget to fix it, than it is to have somebody else's word that the van is perfect. If you do it yourself, you know it's been done. Only a perfect paper trail from an OCD owner is worth a big premium.

Know the market! Research research research! I drive a 93 S700 - I have seen the same van as low as £7000, and as high as £20,000. The 7k van had 350,000km on the clock and was very tatty, but sound. It needed at least 10k spending on it, if not more. The 20k van was as perfect as you will ever see - a paperwork file 2 inches thick, low mileage, long UK MOT history (plus all the German ones!) and had literally every upgrade and no faults. It sold within a week. If you are REALLY into classic Hymers, you will know that pristine vans are worth a healthy premium - and so do others, sometimes it is simply a matter of whoever gets there first after an ad is placed.

Finally finally - know yourself! You need basic practical skills to keep an old van on the road economically. The worst reason to buy a classic van is because it's all you can afford, but you don't have any practical skills, or the willingness to learn. I have seen so many people come a cropper like this - old vans always come with problems - you have to be eyes wide open and regard it as all part of the fun. But if you pay dealer prices every time you have a problem, you will soon be thousands down on the deal.

And do not buy a classic Hymer because you have been told that they are indestructible best in the world and never break. That's rubbish. They are a well built van using 1980s and 90s German technology and quality. This has enabled them to age better than most (but not all) other vans and they have developed a nice reputation based on these facts - but they are only a box with wheels made or wood and metal - not even a Rolls Royce will withstand years of abuse and neglect, so keep this in mind. So look out for vans that come with a story, and be wary of vans without history.

SCAMS - beware! The internet is now a scammers paradise, and in the last couple of years (up to 2024) the scammers have been active in the Hymer scene. Many is the time I see a van advertised on Ebay that I know for sure was sold a month ago! I shouldn't have to spell this out, but will anyway. There is no such thing as a cheap bargain Hymer online. Occasionally you get a barn find or a van being disposed of quickly after a bereavement, but these are getting rare, and if they do appear and are genuine there is usually a bidding war. You just don't bid on any vehicle sight unseen - you don't, and if you do you are daft. If you are serious, you go and inspect before bidding. And you don't fall for any daft scams about bank details, delivery, people dying, leaving the country, emigrating and so on ... you attend in person, you see the photo ID - passport or driving licence - of the seller and you photo it. You get him to fill in the V5 slip in front of you - or just sign it and give you the whole V5 ... then you either pay cash or do online bank transfer there and then. And you don't give deposits. 

The ideal place is the facebook group "Hymermarket" this is where most good owners advertise. Occasionally dealers have tradeins that they want to shift, and there can be bargains, as long as the seller is a bona fide motorhome dealer, not a dodgy bloke in a car park. If in doubt, ask!

Good luck, and join "Classic Hymers Technical" group on Facebook, where you will find a large number of archived posts covering just about every possible technical problem with Classic Hymers, and (usually) how to fix them. The online community is another reason people buy these vans.

Here are the typical layouts of the pre 95 vans - but for detailed info consult the old brochures which are in the group Google drive accessible by all on this link - the brochures are named by year - 1993, 1995 etc ...

https://drive.google.com/drive/folders/154tgv0uo6eFXmBEetj62RNnXq7g5Z1ht?usp=drive_link


Sunday, 27 September 2020

Adding more leisure battery to a classic Hymer ... things to consider

One of the commonest upgrades to the electrical system is to add more battery capacity, but before you do, there are questions to answer and things to consider before parting with your money. This article is not intended as a complete "how to"  but rather a discussion of all the things to consider and the possible pitfalls.

Do you really need it?

One of the first things to consider is to make sure that you actually do need more amp hours, and to answer this you first need to know that your existing battery is really up to scratch. It may just be that your existing battery is so poor that a new single battery is all you need to solve your problems.

Unfortunately testing a battery is not a simple task, unless you have it tested by anybody or any business who has a modern digital battery tester. The only way to test a battery manually is to use a multimeter and a known load. If you can, find somebody with a digital battery tester - most garages have one these days.

So have your existing battery properly tested, and if it is found to be defective or just worn out, replace it with a new single battery and see what a difference it makes. It may just be that a single new battery will perform so much better that you will no longer need to consider adding a second battery.

There is also a huge extra benefit to this approach, because if you do decide to go ahead and add an extra battery, you can add one of the same make and capacity, which is very important. You just go back to where you bought the first one and order an identical one.

Batteries in parallel


The reason for this is that when connecting batteries in parallel, they two batteries should be identical. This is quite an important rule, and if followed will give you the maximum power for your money.

However I have found from some experience that it is not absolutely carved in stone and it is wrong to think that if you break this rule you will get nothing but grief and failure.

The reason the rule exists in principle, is that if you put dissimilar batteries in parallel, then the weakest of the pair will pull the other one down, over time, to its own capacity and performance. So put a good and a bad battery together and the good will suck the juice out of the bad! More or less.

So the situation to definitely avoid is putting a brand new battery in parallel with a bad or old one.

However, it is often possible to put dissimilar batteries in parallel and get some increase in total power. The batteries should be as similar as possible - similar age, similar amp hours and similar chemistry - ie don't mix an AGM leisure battery with a starter battery. You must approach this with common sense and a willingness to experiment. 

Now I will probably attract some criticism for that last paragraph, but I am unwilling to say that you must NEVER mix batteries unless they are totally identical - there are some circumstances when you can. However, in most classic motorhome scenarios most owners will bite the bullet and buy 2 identical. If in doubt - buy new.

Where to put an extra battery


So, having established that you are going to fit a second battery, let's move on to the next problem. Where to put it. Squeezing more battery power into a motorhome is often more a case of finding space than anything else.

In purely classic Hymer terms - The Mercs have a battery box in the floor by the driver's seat that contains both the leisure battery (LB) and the vehicle engine battery (VB). The Fiat family vans usually have the VB under the bonnet, and the LB under one of the front seats. To fit an extra LB can be anything from a doddle to a nightmare. Here are a few examples.

The easiest vans are those that have a dinette or a bench seat that has empty space under it, as close to the original LB as possible. These present a void that is perfect for an extra battery.

However some other vans are the opposite - the S700 and the B694 are good examples - there is a bench behind the driver's seat, but it is full of water tank! There is literally nowhere in the front of the van to fit an extra battery. The only place possible is under the rear bed, and that means a serious amount of cabling. 

Evey van is different, so you just have to find a battery shaped space somewhere.

It can get so difficult that many owners give up at this stage. However there are alternatives. One of these is to forget about adding a second battery, and to maximise the potential of the existing LB space. This might mean finding a slightly bigger really high quality battery, such as an Odyssey or a Northstar, which will maximise the potential of the space - you might not get double the capacity, but you might get to 50% more.

Another more radical route, especially for full timers or power users, is to make the jump from bottled gas to underslung LPG tank, which gives you an empty gas locker for batteries (and other stuff!). This is quite an expensive option, but it does make sense for many - myself included.

But for many, especially owners of the bigger 6 and 7 series vans, there is only one viable option, and that is under the rear bed. This poses other problems, but none which are insurmountable. 

It might seem that the obvious way would be to have a new battery in the front original position, and the second one in the back, connected by long leads. This is valid, but I think there is a better way, and that is to locate both batteries at the rear, or better still, splash out and buy a high quality single battery of double the capacity. A single bigger battery is always the better option if you can, than two in parallel.

The problem with moving the battery to the back of the van, is that all the wires that are connected to the original battery are all at the front - so you might think you are faced with a big rewiring job, but you are not if you approach it the right way.

Spit your dummy out ...


The way to do it is to mount 2 terminals, or busbars, where the original battery used to be, and connect everything that used to be connected to the original battery, to these. They basically represent the original battery - or to put it another way - a dummy battery. So everything remains the same, no rewiring needed, just connect all the original wires as they were. Then all you have to do is to locate the new battery(ies) wherever you can, and then run two wires, good and thick, from the new battery to the dummy terminals.

Using this method, you can now mount a battery anywhere in the van you like, as long as you adhere to basic common sense safety measures. 

Cables cables cables


At this point you would normally expect quite a long discussion on what cable to use, and cable loss. This is a topic that causes some confusion. When working with 12v, unlike 220v, the losses introduced by cable are quite important, as well as its power carrying capacity. For the purposes of this article I am going to simplify it somewhat. The cable you use to connect your extra battery capacity, if mounted remotely - ie at the back of the van - should be capable of carrying between 50 and 100 amps with no more than point one of a volt drop (0.1v) - you can push this maybe to 0.15, but not much more. There are tables of losses and cable sizes all over the internet, and of course you can ask on our FB group - Classic Hymers Technical. If you really want it simple, then you should be OK with copper cables the thickness of your little finger - but copper is expensive, so if you can, take the scientific approach!

But if your batteries are in a convenient location close to the original, then thick cables is less of an issue, unless you have a high power application in mind. So up to around 2m away, cable around 4 or 5mm should do, but again, use the thickest you can afford.

My favourite cable utility is here https://www.12voltplanet.co.uk/cable-sizing-selection.html

Cable routing


If you do end up running cable from the front of the van to the back - you have two choices - through the cupboards, or down through the floor along the chassis, and back up through the floor. Every van is different, but generally speaking it is easier (although dirtier!) to go along the chassis. There is plenty of room under there, and plenty of attachment points. Again, I can't go into chapter and verse about cable routing and safety - all I can say is that unless you are confident that you can run and protect your cables and protect against vibration, short circuit and weather, then perhaps you shouldn't be doing the job yourself.

Another option to save copper, is to just run a single positive (red) cable, and to use chassis for the negative. In this case you would need a very solid bare metal to bare metal chassi connection at the remote battery end. At the front end you would need a solid connection to the VB neg, as this is already connected to chassis by a thick cable. Some purists will not agree with this, but I have used both methods with no problems. Again, if you don't understand what I mean by chassis return, you should come and ask more questions, do more research.

Fuses are essential ...


Another safety issue is fusing. If you are running a long cable to extra batteries, then you must protect that cable against being shorted in a crash. If a live battery cable is shorted to ground as a result of a crash, the battery will immediately discharge over 1000amps in milliseconds, which has the potential to cause a spark and a fire. To guard against this there should be fuses at both ends of a long battery cable run. The easiest to use are "mega fuses" - see photo - usually 100amps is the right size. These should be located as close to the battery as possible.

Parallel Series Parallel Series


Finally, let's talk about batteries in parallel. Batteries in parallel means two (near identical) batteries connected "in parallel", which means the pos and neg terminals of both batteries are connected to each other. Batteries in parallel remain at the same voltage, but double the power. So two 100ah 12v batteries connected in parallel will give 200ah at 12v. Batteries in series double the voltage at the same power, so two 100ah 6v batteries in series would give 100ah at 12v. batteries in series are rarely used in motorhomes, so we will leave it at that.

The next thing you will see if you ask the question online, is that batteries in parallel must be connected as a set - ie you should take power from them, and deliver charge to them via the pos on one battery and the neg of the second, or vice versa. See diagram below. Again, this is a purists view, although completely correct in theory. The reasoning is that this will present the two batteries as one. However in practice, the differences are negligible, and certainly not making the major wiring changes that may be necessary in a motorhome installation. If your two batteries are together and easily wired, then by all means, but if you are faced with major rewiring, then don't bother.

The simplest check you need to do with batteries in parallel is this - with a digital multimeter, check the voltage of both batteries. They should be identical, to two decimal places - ie if one says 12.86v then so should the other.

Treat the system as a whole ... Chargers and Alternators


Next - you need to think about your overall system in the context of bigger batteries. When you upgrade one part of a 12v system you need to think about how it affects all the other parts. The most important of these is charging.

A 10 amp charger should charge a 100amp hour battery in ten hours - again simple arithmetic. So if you up the capacity of the battery to 200 amp hours, then a 10 amp charger will take 20 hours. This means that you could be faced with a situation where an overnight charge from EHU may not have had enough time to recharge your batteries fully. It's an overly simple example, but it illustrates the point.

It gets a bit more complicated than that as well .... a lead acid battery needs to be charged by a charger that is capable of delivering at least 10% - 20% of its capacity. That means 10 - 20 amps for a 100ah battery and 20 - 40amps for 200ah. Personally I think around 15% is about right.

What it does mean is that the original blue box factory fitted dumb Hymer charger (usually 10 amps) really ought to be replaced, especially if you are fitting 200ah batteries.

If you are going to the expense of new 200ah batteries, then you should definitely consider installing a new mains charger of at least 20a, preferably more. 220v chargers come in all shapes, sizes and qualities. The best and most popular is Victron Blue - never known a bad one, plus they have the advantage of being fanless. You don't really want a fan cooled charger running all night and keeping you awake.

The next thing to consider is charging while driving, which is a very important source of power - you want to arrive at your destination with a fully charged set of leisure batteries.

In a standard pre 95 classic Hymer, charge is diverted from the engine alternator to the LB via a relay located behind the fuse box. (in later vans, fitted with an Elektroblock the relay is in here). This relay, and its associated wiring, is designed for the 10 to 20% rule - ie to charge a standard single 100ah LB, it needs roughly 10 to 15 amps from the alternator while driving. This will not automatically double if you double the battery capacity to 200ah. The max amount of charge able to be delivered by the alternator is unfortunately quite a complicated mix of wiring capacity, relay capacity, max capacity of the alternator and other requirements of the base chassis - ie the headlights and state of charge of the starter battery. There are many variables, so you just can't simply expect double.

Some of the early classics only had a 60 amp alternator, most later models had 80 amp or more. In most cases, doubling the battery to 200ah should not result in any major problems - but don't expect the "Strom" meter on the panel, the one that shows you how much charge your battery is getting, to go hard over and show 20 amps of charge from the engine - it might, occasionally, but it won't stay there! So, like the charger situation outlined above, you may be faced with a situation where even a 4 or 6 hour drive may not be enough to charge a 200ah battery from empty. If this is the case, then there are solutions available - usually all you need is a bigger capacity relay and wiring, but occasionally you might (rarely!) need a bigger alternator, especially if your van is an older 80s model, and you desire a really big leisure battery setup.

The same applies to solar - but every solar installation is different, as is the weather, so there are no hard and fast rules about solar, other than the fact that if you are a power user, you need as much solar as you can. For some owners, solar is massively important and their main source of power, for others it's just a top up and trickle charge - every van owner is different.

Lithium


A note on lithium - lithium batteries are coming down in price every year, and are now standard in many new vans. They offer roughly about double the "power density" of lead acid, which means that you can get twice the power from the same space. However, you can't just drop lithium batteries into a classic Hymer - you have to look at the system as a whole. That is not to put you off lithium, just to say that they are still quite expensive, and need careful design and consideration.

Conclusion ...


The takeaway point I am trying to make here, is that the original classic Hymer is designed around a single 100ah leisure battery, based on 1980s technology. You can't just throw in an extra battery and expect to have double power, all the time. That is not to say you can't "just do it", but you should at least be aware of the potential pitfalls.

The good news is that other than finding the space for extra battery in some vans, upgrading and modifying the electrics in a classic Hymer is, compared with many modern vans, relatively easy. They generally have space to work, and the work can be hidden reasonably nicely and a good job made with only basic DIY skills.


This is how batteries in parallel should be connected - in theory

But you can connect them this way if it means avoiding major wiring changes, and on completion, both batteries have the same voltage to 2 decimal places.


This is a Merc battery box with the LB removed and replaced by a dummy. All the connections that used to go to the LB are now connected to the dummy - pos on the left, neg on the right, and the remote LB is now connected to the dummy. In this case, chassis is being used for the neg return, and the red wire, centre lower, goes to the relocated LB.


This is the same setup, but now with a protecting mega fuse added (the small square yellow thing!), and a Victron Cyrix relay replacing the original Hymer relay, to deliver more alternator charge to a bigger LB setup at the rear of the van.


This (work in progress) photo shows an Odyssey PC1800 220ah battery fitting snugly in a repurposed gas locker. The blue box is a Victron inverter charger.