Classic Hymers for Newbies! (Updated for 2020)

A lot of owners are old hands and take the basics for granted. But we all have to start somewhere, and if you have just bought your first Classic and have no idea how it works, then this extremely basic guide will get you on your way.
This guide should be useful to most pre 95 Hymer owners. But bear in mind that there may be differences, especially with fridges.
New in 2020 - more photos, updated info and a new section at the end on common faults, accident damage and suppliers.
New in 2020 - more photos, updated info and a new section at the end on common faults, accident damage and suppliers.
Electrics
The first thing to remember is that a motorhome is a caravan body on a commercial van chassis, even the ones that look as though they don't have a recognisable cab. Think of the van as a "load" on an empty van chassis. Merc or Fiat made the engine, controls and chassis, and Hymer then built the van onto it. This means that all the electrics and systems on the base chassis are different and separate from the van electrics and systems. So you have Hymer electrics, and you have Fiat or Merc electrics, and the two systems are completely separate. This is why the van has 2 fuse boxes - one for the Hymer side and one for the Fiat or Merc side.
You have two batteries. One for the Merc or Fiat chassis, and one for the Hymer and they are completely separate. The chassis battery does not power the living part of the van (also known as "habitation") and the habitation battery does not power the chassis - i.e. it won't start it.
These two batteries are fundamental to your understanding, and from now on will be referred to as LB for leisure/van battery, and VB for vehicle/chassis battery.
Both batteries are charged from the engine when you are driving. So when you arrive on site you should have 2 fully charged batteries. The LB will then power your living area, and the VB will do absolutely nothing. This means that you can run out of power from the LB, but the van will always start, and as soon as you do, the LB will start to be charged up again from the engine. VB power is never used for living - it's only for starting the van.
A common mistake is to leave the headlights or sidelights on all night, and flatten the VB. Nothing can prevent this except getting into the habit! At least you can make a cup of tea while you wait for breakdown to come and start you up. We've all done it!
All the exterior lights - sidelights brake lights etc, are fused from the chassis fuse box. All the habitation interior lights are fused from the Hymer fuse box.
On Mercedes there is usually a battery box that contains both batteries - LB and VB, and the habitation fuse panel is adjacent to the drivers left knee (LHD vans).

On Fiats and derivatives the VB is usually under the bonnet, and the LB is under one of the front seats. The habitation fuse panel is usually by the drivers left knee (LHD vans) or the passengers right knee (RHD vans).
The fuse box in classics uses the old style Bosch barrel fuses. These are still available online and from Halfords. Behind the fuse panel is a box, which pulls out if you remove 4 screws. In this box are the relays and the shunt. Just so you know.
The fuse box in classics uses the old style Bosch barrel fuses. These are still available online and from Halfords. Behind the fuse panel is a box, which pulls out if you remove 4 screws. In this box are the relays and the shunt. Just so you know.
The vehicle fuses are usually in the passenger footwell somewhere.
There is a big red switch handle close by the habitation fuse box. You can't miss it. This is the 12v emergency cut off switch. Normal "on" position is down. To isolate, turn it either way so it pops out. This is only for emergency, normally it should be left on. You can switch off for winter storage if you like. If you smell burning, like plastic burning, then you operate the big red switch, and then outside unplug the van if on hookup. Fires are rare, but they do happen. Make sure you have a big, up to date, fire extinguisher, a proper smoke alarm, and for good measure, a carbon monoxide alarm. Especially if you have children.
Control Panel

Most classics have a panel with 2 meters. One marked "Spannung" and the other "Strom". This is German for Voltage and Power. Next to the left meter, voltage, is a switch marked Battery 1 and Battery 2. It's a rocker switch. When you press either way, then the meter should light up, and the needle will indicate the voltage of the battery. Battery 1 is the VB, and should never change when you are parked up, and battery 2 is the LB, and this will very gradually reduce from over 12v to below 11v as you use the power from your LB. You will see that the dial is calibrated not only in volts, but in green and red zones! You should avois running the battery into the red zone. In fact, by modern standards, the red zone starts a bit too low, you shouldn't really run a battery below 11.5 or 12v. But the old Hymer meters are not as accurate as modern digital ones, so there is a bit of leeway.
You can get some indication as to the health of your battery by looking at the voltage meter, but only when the battery is "resting" ie not being charged or discharged. So if you have solar, wait until night, and not on EHU. A fully charged battery will "rest" at 12.8v and will fall to around just under 12v as it discharges. So in the evening, when you are on battery power only, you can get an indication of how well your battery supplies your needs. If it regularly is at under 12v by bed time, perhaps after you have been using a TV or something else, then maybe it's time to look at your system - regularly discharging a 12v battery to 11v and below will shorten its life - but that depends on the quality of the battery.
You can get some indication as to the health of your battery by looking at the voltage meter, but only when the battery is "resting" ie not being charged or discharged. So if you have solar, wait until night, and not on EHU. A fully charged battery will "rest" at 12.8v and will fall to around just under 12v as it discharges. So in the evening, when you are on battery power only, you can get an indication of how well your battery supplies your needs. If it regularly is at under 12v by bed time, perhaps after you have been using a TV or something else, then maybe it's time to look at your system - regularly discharging a 12v battery to 11v and below will shorten its life - but that depends on the quality of the battery.
The right hand meter - Strom - has the needle always in the middle - known as "centre zero". Green zone to the right of the needle, and Red zone to the left. If the needle is in the red, then you are using power. If the needle is in the green, then the LB is receiving power by being charged. With the engine running, or on hookup (more on hookup later) then you should see the needle in the green. There is no control of this meter - it is for info only. But by looking at it when you switch things on and off, and comparing it with the voltage of Batt 2 (LB) you should over time get familiar with the power system in your van, and it is good for troubleshooting. It is calibrated in amps, but again, it is not very accurate by modern standards. The main thing is that it should deflect either way to indicate charge or discharge, but bear in mind that this will change according to the state of charge of the battery - if the battery is fully charged then don't expect to see the needle deflect much into the green, It will only do so if the battery needs and is receiving a big charge.
A very useful and cheap accessory to fit in a classic van, is a digital volt meter - points of a volt are important at 12v, and having a digital meter to 2 decimal places is much better than an old analogue needle meter. These days every owner needs lots of USB sockets. These are easy to fit, and some of the better ones have a digital voltage display as well.
Also note that if you have solar panels fitted, the charge from these may not be indicated by the Strom meter. Solar panels were not a factory option and were often fitted direct to the battery, and not via the meter.
While you are hooked up to EHU, the voltage meter will be up above 13v all the time and the Strom meter will generally stay in the green all the time.
On the very left is a switch marked Frischwasser/Abwasser - this means Freshwater/Greywater and when pressed will indicate the level of either the fresh water tank, or the grey water tank. The lower part of the meter is calibrated "leer" 25% 50% and 75% and "voll". leer = empty, voll = full. It is not a continuous display. The level is not driven by a float as in a petrol tank on a car. There are 4 sensors in the tank, so the needle will jump between the 5 positions. It is only a rough guide. In old vans this system often gets clogged with dirt and stops working after many years.
In the middle of the panel is the dreaded "switch with no name". This is an extra switch for options and/or owner fitted modifications. Yours may or may not do something. On many vans it has no function. Possible uses have been known to include - water pump isolation switch, external light switch.
Next to this is often a switch named "Lufter". That means fan, and operates the fan in the space above the cooker, to extract cooking smoke. There should be a lever under the panel which opens and shuts an external vent. All vans are different, so just check yours out and work it out.
Next to this is often a switch named "Lufter". That means fan, and operates the fan in the space above the cooker, to extract cooking smoke. There should be a lever under the panel which opens and shuts an external vent. All vans are different, so just check yours out and work it out.
On the right there is a light switch called "Licht" which operates the kitchen light. On many vans there is also a switch by the entrance door for this light - similar to the two way switches that operate the landing light in a house.
On most classics, the whole control panel is secured by just 3 screws along the front lip and if you undo these the panel will drop down on hinges, exposing the gubbins inside. many panels have a clock and/or a radio fitted - this is how you get at it. It also gets a bit dirty in there because of cooking, so you should have a gentle clean around every few years.
On most classics, the whole control panel is secured by just 3 screws along the front lip and if you undo these the panel will drop down on hinges, exposing the gubbins inside. many panels have a clock and/or a radio fitted - this is how you get at it. It also gets a bit dirty in there because of cooking, so you should have a gentle clean around every few years.
All the other lights in the van are usually operated by switches built into or adjacent to the lights themselves. Most Hymer original lighting consisted of 12v halogen spots and 12v strip fluorescent tubes. In the bathroom many vans have a column light with 4 bulbs in it.
Ever since the introduction of LED lighting most owners have converted all their lights to LED thinking they will save power. While this is true in theory, in practice it isn't as much as you might think. If you still have original lighting, think twice before ripping out the original lighting, especially if you like the "retro" look and feel. Some LED lighting can be harsh and not comfortable and should be planned and designed carefully. I have written about this elsewhere on this blog (see index). If you do convert to LED, the golden rule is always make sure you buy "warm white" LEDs, not "cool white".
The 12v strip lights are now obsolete - you can still get the tubes, but not the shades and transformers. These can be nicely converted using 12v warm white led strips inside and look good while preserving the original design.
Electrical Hookup - also known as EHU.
There is a socket on the side of your van and you should have a cable that you can hookup to the mains on a campsite or at home (with a suitable adaptor).
On most vans there is an electric socket somewhere in the kitchen area, and also in the TV cabinet if fitted. All vans are different so look for your sockets. These will be euro style, so buy some adaptors. You can usually plug anything into these that you would at home, but not always. Many campsites limit the amount of power available through the hookup, so anything powerful that generates heat - kettles, toasters etc, may either not work, or trip out the supply. All camp sites are different, especially on the continent, but generally you should be able to run a kettle or a toaster in the UK. Most people use a gas kettle. TV's and laptops and most other stuff can be powered from these sockets, and the sockets are only live when hooked up. For the technically minded most UK campsites use 10amp trips, which is equivalent to about 2200w or 2.2kw. This is more than enough for hairdryers, microwaves, kettles, oil radiators, small fan heaters and coffee machines. European sites often (but not always) have lower trips - 6amp or even less.
While you are hooked up, your LB will be charged up by a battery charger. Usually this is a small blue box hidden away somewhere. Sometimes it emits a gentle hum. It should just work, and you should see the needle go into the green when hooked up. You should remember that when hooked up, all your lights and fans, in fact everything that works on 12v when you are not hooked up, are still powered from the LB. But the LB receives enough charge from the battery charger to compensate for this use, and stay charged. The only things on the van that actually use 240v are the fridge, and the charger, plus whatever you plug into the sockets. Everything else still works on 12v, even though you are hooked up.
By modern standards the blue box charger is old technology. Modern chargers are digital and make a better job of charging and maintaining your battery when on EHU. While there is no pressing reason to change - if it works don't fix it - if the situation does arise that your battery charger gives up the ghost and needs replacing, then replace it with a modern digital charger of 10 to 15 amps. Ask on the groups and forums for recommendations, or consult your dealer if you have one. (Note - this applies to pre 95 vans that have a separate charger. 95 is about the time they started to fit "Elektroblock" chargers made by Schaudt. If your van (most pre 95 classics don't) has an Elektroblock, then this doesn't apply to you. If in doubt, ask)
By modern standards the blue box charger is old technology. Modern chargers are digital and make a better job of charging and maintaining your battery when on EHU. While there is no pressing reason to change - if it works don't fix it - if the situation does arise that your battery charger gives up the ghost and needs replacing, then replace it with a modern digital charger of 10 to 15 amps. Ask on the groups and forums for recommendations, or consult your dealer if you have one. (Note - this applies to pre 95 vans that have a separate charger. 95 is about the time they started to fit "Elektroblock" chargers made by Schaudt. If your van (most pre 95 classics don't) has an Elektroblock, then this doesn't apply to you. If in doubt, ask)
Mains 220V
Somewhere in the van is a small consumer unit - similar to the one at home but much smaller. It has trip switches that will cut off the mains in emergency or a fault. You should know where yours is as it is the first place to look if the power goes off. For the reasons stated in the last paragraph, the lights and fans will stay on if the hookup power goes off, but the fridge and the charger will stop working if it trips out. So learn how to recognise when you are on hookup, and when not. Many a fridge full of food has been ruined and a LB run flat, when you thought you were hooked up, but were not. The green light on the fridge, if fitted, is the easiest indication of this. Many owners get into the habit of pressing the Battery 2 button when they pass. When hooked up it should always be well over 13v. If it starts to drop when on hookup, then start looking for a reason.
A fully charged LB should do you for a weekend of wild camping with no hookup, assuming normal use.
Inverters
An inverter converts 12v battery power to 220v when you are not hooked up. They were not fitted as original equipment, so are beyond the scope of this article. However, if you do have one, then familiarise yourself with it and how it works - ask on a group or forum.
The same goes for
Solar
Solar was not fitted by Hymer at the factory, but many vans had solar fitted by the dealer when the van was brand new. So you could have a solar system that is original and nearly 30 years old. Or it could have been fitted at any time since either by an owner or dealer. It may or may not work well - no way to know without testing it. However it is fair to say that modern solar systems are much more efficient that they were 30 years ago, and lots cheaper - so if you want solar, then make sure your system is up to scratch.
Water system.
Somewhere in your van is a fresh water tank. You fill the tank with water - please don't put diesel in it! In the tank is a submerged pump. In each tap there is a hidden electrical switch called a microswitch. When you open a tap, the pump operates, water comes out. The pump has a fuse in the habitation fuse panel. It is not a pressured system like in a house, although there is a slight pressure. A common problem is that the switch in the tap fails, so the pump doesn't operate. You can prove this by opening the faulty tap, and then opening a different tap - water should come out of both taps. This is a useful work around if you have a faulty switch - until you can get it fixed.
Can you drink the tank water? Generally yes - I have for 20 years. But old vans can get a bit tainted so use your nose. There are all sorts of methods of cleaning the tank and pipes - it's just the same as a caravan or boat.
Can you drink the tank water? Generally yes - I have for 20 years. But old vans can get a bit tainted so use your nose. There are all sorts of methods of cleaning the tank and pipes - it's just the same as a caravan or boat.
Waste Water - Grey Water
The waste water goes down the plug, into a tank - called the grey tank. On the tank outside is a valve. you empty the tank when you can down a grid. There is sometimes an extension hose hidden within the back bumper of the van. If you are lucky, the gauge on the control panel will display the level of fresh and grey water in your tank. If not, you have to guess, but it is normal just to empty your grey tank whenever you get the opportunity - usually when you fill with fresh.
The grey tank can smell a bit in summer. Many owners mistake this smell for the toilet - it's not. What happens is that the grey tank never really gets full - it gets emptied regularly, so what happens after many years is that it gets a bit crusty in the upper half of the tank, and it gets worse in summer when it's hot and the odour backs up through the sink plug holes. You can minimise the problem by regularly rinsing a dash of bleach down each plug hole - you don't need a lot. Another favourite you will see online is cheap cola - I think it's rubbish, but you can try it. If it gets too bad, then a good trick is to fill the grey tank right up to the top with water bleach and disinfectant and then go for a nice long drive, and then empty it out at the other end. This should clean the upper reaches of the tank and make the problem better.
Hot Water
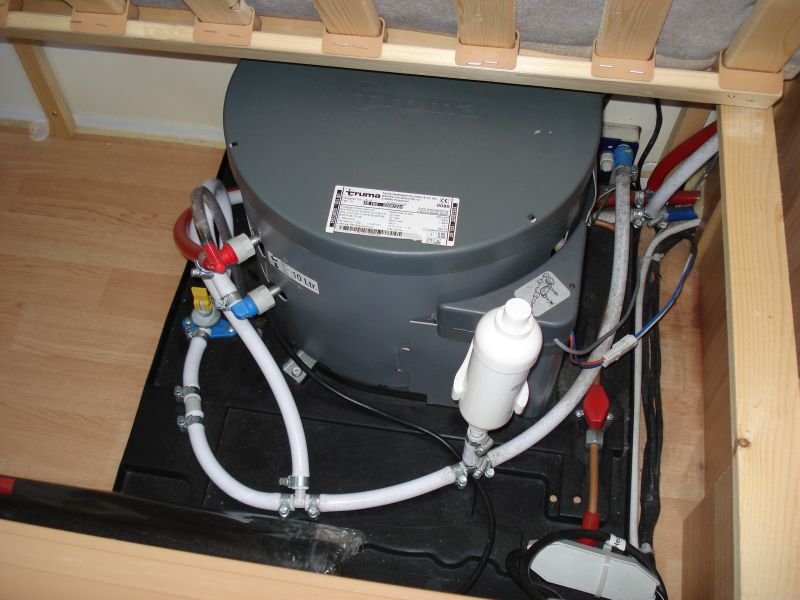
Most vans have a Truma boiler like this (but maybe not identical) hidden away somewhere in a cupboard or under the bed. Basically it is a big pan of water in a box, heated by gas and controlled by electricity. There is a control box with a switch and a dial. The switch switches it on and off, and the dial sets the temperature, from lukewarm to scalding hot. It's as simple as that. It needs water and gas and electricity - you press the switch, and after a few seconds you should hear a clunk, and the green light comes on. If you get a red light, there's something wrong. The commonest reasons for a red light are either a flat battery or no gas. Another common fault is a blocked flue - quite often after winter storage animals or insects have nested in the flue outside. There should be a winter cover to prevent this, but it often gets lost and forgotten. The heater won't work if the winter cover is left on.
There is 10 litres in the tank, and it takes about 20 minutes. You can get a leisurely shower for one, or a quick shower for two. You will feel the shower water get cooler, but you can increase the hot flow on the shower tap and get one last minute or so to rinse. The hot water doesn't just disappear, you get a few minutes warning.
It is OK and not particularly wasteful of gas or electric to leave the water heater switched on, particularly if you are a busy family. Or you can switch it on as required - but its up to you.
Heating

Most vans have a brown panel heater that looks like an old fashioned storage heater. It is made by Truma and on 5 series vans it is usually a Truma 3002. On 6 and 7 series vans it is often a Truma 5002, which is just a bigger version. It has a dial on top. Like most old fashioned gas heaters, you press and turn the dial, and release when the flame is established. If you look closely you will find a tiny inspection window and you should see the flame. You may hear a tic tic sound, which is the ignition system.
Not only does this brown heater radiate, but it also (in most vans) heats up hot air and a fan blows the hot air through a system of ducts to outlets all round the can. Look for these outlets, around 4 inches round, and they should have plastic butterfly valves that enable you to adjust the flow of air. They are similar in concept to the air vents in a car.

The fan that blows this warm air has its own control, and if you want hot air distribution then you must switch it on, after lighting the heater. It's a little brown box like the others, and is usually marked "Truma Vent". The switch is 3 way, centre off. Up operates the fan manually, and the dial sets the fan speed. Down is an automatic setting that is supposed to adjust the fan speed according to a thermostat in the switch. On many old vans this function is either not working, or unpredictable and so most owners use the manual option. It is also useful in hot weather to run the fan at full speed with the heater off, as this will circulate air around the van. This fan can "sing" as it gets older. The bearings get worn. usually you can find a setting where it isn't too bad. It's the Hymer sound.
The fan also gets very dirty with dust after 20 years or more - cleaning it can improve circulation dramatically. There is another article on this blog about this here about this.
https://hymers700.blogspot.com/2019/01/cleaning-truma-blown-air-heating-fan.html
https://hymers700.blogspot.com/2019/01/cleaning-truma-blown-air-heating-fan.html
Running the fan all night is fine - how else are you to keep warm in winter? It does use some battery power, but not much. A fully charged LB should run the heater fan non stop for at least 48 hours. You van has blown air central heating - don't be afraid to use it!
On some vans if the LB runs flat, the fans will stop, but the heater will still radiate.
Fridge
No other appliance causes more grief than the fridge! But you have to remember that in most Classics, the fridge, which was state of the art 20 years ago, is now over 20 or even 30 years old, and may or may not have been serviced regularly. There are quite a few different fridge designs used in Classic Hymers, so I can't be specific about your fridge, but I can describe the basics.
The fridge works on mains (when you are connected), gas, and some work on 12v but only when you are driving.
It is a common misconception that the fridge works on 12v from the LB. It doesn't. It only works on 12v fed from the engine alternator when the engine is running. This is because the fridge needs a lot of power on 12v, too much for the LB, so is only designed to work on 12v when driving. Most fridges have a red switch to select 12v operation. Some red switches illuminate, others don't. This switch has no function unless the engine is on, but needs to be on if you want 12v cooling when driving. When on 12v when driving the fridge does not stay as cool as on gas or hookup. It is just designed to keep cool while driving. Don't load up a warm fridge with new food at the start of a long drive and expect it to be cool when you get there on 12v. Pre-cool the fridge the day before on hookup or gas so you load food and beer into an already cold fridge. Use ice packs or even bagged ice, especially in summer, to pre cool the fridge if you can't have it on for 24 hours first.
Most fridges have a green switch, which may or may not illuminate. This switches the fridge on from 240v hookup. It will only work if you are hooked up.
Gas. It depends on your fridge model, but the basics are that you press and turn the gas dial and hold it in until the fridge ignites. Ignition can be automatic - with a flashing red switch, or manual, with a button you press. I can't be more specific as there are many different fridges. Some fridges have a window, some fridges you can hear the gas, on some fridges the red ignition switch stops flashing when the fridge is lit, and starts flashing again if the gas goes off for some reason. Hopefully you have a manual.
When on gas, but hooked up, the green switch should be off. You should not operate the fridge on both mains electricity and gas at the same time.
The gas part of an old fridge is the most likely to fail - it really needs a service every year, and should be part of your annual habitation check.
"Fridge doesn't work on gas"
This is the commonest problem and most asked question on all the groups and all the forums, not just for Hymers, but all caravans and motorhomes over 20 years old. Here is the basic information as to why this is.
The first golden rule is this - if your fridge doesn't work on gas, then get it plugged in to EHU as soon as possible. If it then works on 220v then there is nothing wrong with the actual refrigeration bit - it's just the gas bit. But if the fridge does not work on 200v or gas, then that could be serious and it may be time to get a new fridge. The simple rule is this - in order to work, the fridge only needs a source of heat - either from the gas burner, or from the 220v element. If it works on either one, then the problem can usually be fixed.
The reason it fails on gas more than on 220v is that there are more moving parts on the gas side, and the gas side needs regular cleaning and maintenance. the 220v element is very simple by comparison - it either works or it doesn't.
This is how the gas system works. At the back of the fridge there is a chimney - it is actually a heat exchanger but it looks like a chimney. Inside it is the 220v element. There is also a 12v element on most fridges - only used when driving. At the bottom of the chimney is a small tin box, and inside the tin box is a burner. It's a bit like a tiny gas stove, only the ring is the size of a 20p piece and the flame is about the size of a medium sized candle flame. But it should be blue, and make a very gentle roaring sound.
The commonest problem is that years and years or dirt and dust have got in there and have prevented the flame from either igniting, or making it too small. In most cases all it needs is a good clean. It is such a common problem that there are literally hundreds of articles, blogs and videos on how to do it, including on this blog, and the groups I manage on FB.
There are other reasons why a fridge might not work on gas, or might not be cooling well in summer (hint - bad ventilation, corroded connections), but these are also covered elsewhere.
There are other reasons why a fridge might not work on gas, or might not be cooling well in summer (hint - bad ventilation, corroded connections), but these are also covered elsewhere.
The main point is this - don't let a dealer sell you a new (£1000+) fridge until you have had it checked by yourself or an honest friend - they can be fixed. Also, do NOT take any notice of online rubbish about taking the fridge out and rotating it. Or vibrating it. While there is a grain of truth in these procedures, they have to be done in the correct way by an expert. Done badly or wrongly they can terminate a fridge that could otherwise have been saved. All this is covered elsewhere.
Finally - not all fridges can be saved - if it doesn't work on gas or 220v and has been checked by a pro, then there is not a lot to do. 3-way fridges work on a sealed chemical system that is closed. Eventually the chemicals separate and can't be remixed, and too much corrosion on the inside of the pipes blocks the circulation. But at least it lasted 20 or 30 years, which isn't bad.
Gas bottles and gas.
Somewhere in the van you will find a set of gas isolation switches with various symbols on them - e.g. a snowflake for the fridge gas supply. These have a purpose, but for the purposes of this basic guide, you should not touch these on a day to day basis. Leave them on.

Convention is that you should turn off the gas at the bottle when driving. Many owners don't. You should always turn off the gas at the bottle for storage.
I can't tell you how to change a gas bottle, because it's a safety issue. Get somebody competent to show you. Once you know - you know.
With fridge on gas, normal cooking, and the odd blast of heating in summer, or heating on permanently in winter, then you can expect one 11 or 13kg gas bottle to last you a month in summer, or a week in winter. This is an extremely broad estimate. The fridge and the water heating and cooking use relatively little gas, but the central heating if on 24/7 in a cold winter will use a bottle in 4 to 7 days depending on how hot you want to be and how cold outside.
Hymers are all weather vans - people go skiing in them. You can be 25 inside and minus 10 outside - it's just a matter of gas.
In normal use, most new owners are pleasantly surprised at how little gas their van uses. But it pays to understand and get a feel from it, as unlike the other systems, there is no meter that tells you how much gas you have left. You have to get a feel for it. Some owners shake the bottle to see how much is left, others feel down the side of the bottle with their hand because the actual level of the liquid gas is colder, but most folk have two bottles, and swap over when one empties, and then know to get a new bottle when they can.
Many vans have refillable systems fitted, either refillable bottles or underslung tanks. Ask online about these.
The 50mb issue
This is a bit technical, but it is very important. Pre 95 classic Hymers left the factory with 50mb gas pressure systems. This was unique to pre 95 Germany. The rest of Europe used 37mb gas pressure. A pre 95 Hymer has gas appliances - the cooker fridge and heaters set up for 50mb gas pressure, and the bottles have 50mb regulators. There should be a big square sticker in the gas locker that says 50mb.
The problem is that because the UK never used 50mb, when a van was imported into the UK, many dealers simply didn't know this, so innocently replaced things with 37mb components - especially regulators, which have to be changed every few years by law.
So the basic rule is this - all owners of pre 95 classic Hymers should know about this and have their vans checked by a pro - a pro who is familiar with the problem. There is lots and lots of info and discussion online and on the groups, so new owners should ask.
Common situations are - new 37mb regs being fitted when all the appliances are 50mb. New 37mb fridges or heaters being fitted to a 50mb van. If you are a new owner - seek advice.
Cooker
Press and turn and ignite manually. Buy a gas wand.
Ovens
Ovens are a uniquely British thing - the Germans simply never fitted them! If your classic has an oven, it has likely been fitted afterwards.
Sewage - Black Water
Most Classics have a Thetford C3 cassette toilet system. It has a big knob that you turn to open the flap, and press to flush.

You open the toilet flap, do your business, press the button and if you are lucky you will get a bit of flush water - clean the bowl with the brush and push the doings down into the tank. Close the flap.
You will see when it starts to get full.
Outside the van there is a small door. Open the door, press the yellow safety catch that holds the cassette in place. Pull out the cassette, toddle off to the nearest disposal point, take off the yellow cap, press the air release button, and pour away. Pour in some blue fluid (see the side of the bottle) and leave a few litres of fresh water in the cassette. There is always a hose at the disposal point. On camp sites the water hoses for drinking, and flushing the sewage are separate by law, even though it's the same water. NEVER mix them up and use them for the wrong purpose.
Those are the basics of the dreaded cassette!
The commonest fault is either no flush, or a dribble of flush that pools in the bottom of the bowl. There is a valve inside (under the toilet roll holder) called a solenoid valve, and this usually dies of old age after 20+ years and needs replacing. The info is online.
The commonest fault is either no flush, or a dribble of flush that pools in the bottom of the bowl. There is a valve inside (under the toilet roll holder) called a solenoid valve, and this usually dies of old age after 20+ years and needs replacing. The info is online.
Windows
The windows are delicate! Approach them with care, learn their little ways and never ever force them. Correct operation should be smooth and need no strength. Windows in Classics often get worn with age. Everything can be fixed, but they are fiddly to work on.
Each window catch has a button which should always be pressed when operated. Don't force the catches. The window is held open by stays at the side. Some stays are friction operated, some stays have click latches. Gently learn how yours operate.
Most van windows have built in blinds. The blackout blind pulls up from the bottom. You squeeze the two buttons between finger and thumb, hold and gently pull up. If you release the buttons then let the blind down gently, it should locate in stops. If you look closely you will see that the buttons on the handle operate little pins on each side that locate in stops in the tracks at the side - hidden from view. Learn how they operate - they get worn on old vans.
Sometimes worn blinds will shut suddenly giving you a shock! This is because the pins get worn with age. Every window and blind in the van has its own character.
The flyscreens, fitted on most vans, pull down from the top. These don't have latches or buttons. You pull them down to meet the lower blind, and they should click together at the handle. The two blinds will then move up and down in unison. You can have a window open, the blind half up, and get fresh air but no insects. You can also have the flyscreen fully down and latched to the closed blind at the bottom for max ventilation and full protection from insects.
Do not get into the habit, at night, of ramming the lower blind up into the the closed flyscreen at the top in the hope that it will all click together. This will work, but will shorten the life of the blind. Pull up the lower blind almost closed, then pull down the flyscreen so it clicks and locks smoothly, and then raise them both to the fully closed position.
In summer or winter, with the blind fully closed, but the window slightly open, you will get some ventilation through the slots you can see in the frame of the window.
Treat your blinds carefully! I have blogged about blind maintenance elsewhere.
Habitation DoorTreat the main door with respect - it is expensive if it goes wrong. The hinges have been known to break, and are hard to obtain. Don't let the door blow in the wind - secure it well. many a holiday has been ruined by a broken door. Keep an eye on it's fit and alignment and adjust as necessary.
Odds and Sods
Cab radio. Many radios in the cab are powered from the VB not the LB. If yours is so, then playing very loud music for a very long time may unexpectedly run down your VB. If this is an issue for you - get it sorted, it's an easy job to reconnect the cab radio to the LB instead of the VB. A few hours of gentle background music will not run down your VB, only hours and hours at full volume will. If in doubt keep an eye on battery 1 meter. If it drops below 12v because you have been playing the radio, then switch off, start the engine, and if successful, let it tick over for 15 mins. Then go get your cab radio rewired.
The step. Some vans have manual steps, others are electric. Some vans have a warning light that the step is down. Nothing is more embarrassing for a newbie than driving off with the step down and maybe causing damage. So get in the habit of a check list. Fridge on 12v, step up, heating off, roof light down, windows closed, cupboards closed and latched. The check list for every van will be slightly different - it's the habit that counts.
That's it!
This is a very basic guide, not an instruction manual. Most but not all pre 95 Hymers are roughly as described.
Many vans have solar panels, TV systems, music systems, and all manner of accessories, but none of this is relevant to this very basic guide.
Common problems
Here is a list of the commonest problems that occur with classic Hymers, and all of these problems are covered in other blogs or in the groups online - I list them here so that if they happen to you, you will be at least re-assured a bit.
Mercedes
Loss of power on hills or even stuttering and then stopping. Cause - fuel starvation - the filters haven't been changed. Easy to fix.
Loss of ability to change gears. Cause - the selector arms on the side of the gearbox have come loose. NOT a new gearbox, so don't be conned. Easy fix.
Graunchy noises turning corners or going over bumps. Cause - worn suspension bushes.
Glowplug light comes on and bad cold starting. Cause - one of more glowplugs are faulty. easy fix - replace as a set of 5.
Graunchy noises turning corners or going over bumps. Cause - worn suspension bushes.
Glowplug light comes on and bad cold starting. Cause - one of more glowplugs are faulty. easy fix - replace as a set of 5.
Temperature gauge climbs towards red zone on long hills. Cause - faulty viscous fan - ie fan not cutting in when it should. Also caused by an old radiator blocked with years of dirt.
Engine rattles on tickover. Most old mercs have a distinctive tic tic tic which is the tappets, but if its a noisy rattle then it's nearly always the fanbelt tensioning mechanism. This needs replacing every 10 or 20 years. Lots of info online. Make a recording and post it online.
Fiat (and Fiat family).
I am not a Fiat expert, but the commonest problem with older Fiats is the loss of 5th gear. This is covered online. Again, do not be conned into a new gearbox. It can be fixed easily, but you need to find a good garage that is familiar with the problem.
Habitation - the living area.
Dashboard appears to be moving on its own accord, on bumps and corners. Cause - The wooden dashboard has come loose after many years. It needs doing on most vans at some stage. It's a well documented fix - all you need is basic tools, drill and jigsaw, and a sheet of marine ply from the local merchants. At the same time you can re-soundproof the front of the van.
Leaking windows
Every time it rains heavily - really heavily in the wind - go round every window inside with a torch looking for water. The windows are sealed with sealer but this breaks down after many years. All windows on all vans need re-sealing at some point after 20+ years. It's a very easy job, but to do it properly you have to take the whole window out. Do not put new sealer on top of old, and do not use silicone. Loads of helpful info online. If you find water inside any part of the van, you MUST act. Damp and rot can ruin your pride and joy if left untreated.
Every time it rains heavily - really heavily in the wind - go round every window inside with a torch looking for water. The windows are sealed with sealer but this breaks down after many years. All windows on all vans need re-sealing at some point after 20+ years. It's a very easy job, but to do it properly you have to take the whole window out. Do not put new sealer on top of old, and do not use silicone. Loads of helpful info online. If you find water inside any part of the van, you MUST act. Damp and rot can ruin your pride and joy if left untreated.
Soft spongy floor
Most classics have floors not made of solid wood but of a sandwich type material with foam insulation. If you feel spongy bits, usually in the kitchen area, then don't panic. This can be fixed by injecting a special expanding foam. Ask online.
Leaking rooflights
Quite common, can be fixed, but act quickly otherwise your roof will rot.
Cracked shower tray and sinks.
Can be fixed nicely in situ by a company called Speedcoat. Shower trays are a big job to take out so try and fix in place if you can. If you just want a watertight fix and don't mind to see the repair, then you can fix with a special glue called Repaplas - ask online.
Sinks, cracked plug holes. We have fixes and suppliers for most problems. Ask online.
Sinks, cracked plug holes. We have fixes and suppliers for most problems. Ask online.
Water taps and showers - ask online.
Accident Damage.
If you have an accident in a classic Hymer, most likely your insurance loss adjuster will try and write it off - most major repairs are likely to cost more than the insurance value of the van. Because the vans are old most dealers, including official Hymer dealers, won't want to know. The only way to hopefully prevent your precious classic being written off is to get an expert on the job. And there are only two in the country and one of those has just retired (Hambiltons in Preston). The other one is Peter Curry at North Cotswold Motorhome Services. Peter has saved many vans from write off, and knows old Hymers inside out. There may be others - if you know of one, let me know. Don't be pushed around by your insurance company. If you love your classic van, then agree an "agreed value" with your insurers. This will prevent any future shocks. I have known folk pay £15k for a nice classic but only been offered £9k as a write off.
Spare parts
Brownhills and Coastal Motorhomes are your main suppliers. But ask online for advice. Hymers are German vans and still very popular over there, but the German scene is hard to navigate because of the language problem. But we do have contacts if needed.
Your number one resource for Classic Hymer Technical info is the Facebook group I run called "Classic Hymers Technical"
Your number one resource for Classic Hymer Technical info is the Facebook group I run called "Classic Hymers Technical"


